Expose Android Malware in Seconds: ANY.RUN Sandbox Now Supports Real-Time APK Analysis 

It’s here! The news security teams have been waiting for: ANY.RUN now fully supports Android OS in its interactive sandbox! 

Now, you can investigate Android malware in a real ARM-based sandbox, exactly as it would behave on an actual mobile device. No more blind spots or unreliable analysis. 

With this release, ANY.RUN allows SOC teams, incident responders, and threat hunters to analyze Android threats faster, more efficiently, and with greater accuracy while reducing operational costs. 

And the best part? Android OS support is available to everyone, including Free plan users! 

Why Your Team Needs Mobile Threat Analysis Inside ANY.RUN’s Android Sandbox 

Android malware is a direct risk to businesses, financial institutions, and enterprise security teams. Attackers are targeting mobile devices to steal credentials, infiltrate corporate networks, and compromise financial systems.  

Without real-time mobile threat analysis, businesses face delayed detection, higher security costs, and increased exposure to cyber threats. 

Now you can interact with APK files in a fully controlled environment, track malicious activity in real time, and generate in-depth reports: all in one convenient place. 

By analyzing Android threats inside ANY.RUN’s secure cloud-based environment, businesses can: 

  • Spot Android malware in seconds: Run suspicious APKs in a real Android environment and catch threats before they spread. 
  • See exactly what malware is doing: Watch how it abuses permissions, steals data, or makes shady network connections, no more guesswork. 
  • Make Android threat investigations easier: Quickly analyze mobile malware without slowing down your team or piling on extra work. 
  • Take full control of your data: Analyze Android threats in a private, secure environment where only your team has access, no third parties involved. 
  • Improve collaboration: Generate structured reports with detailed APK insights, making escalation and knowledge sharing between your team more effective. 

How to Get Started with ANY.RUN’s Android Sandbox 

Getting started is quick and easy.  

Since ANY.RUN is fully cloud-based, there’s no need to download or install complicated software. Just sign up and follow these simple steps to start analyzing right away: 

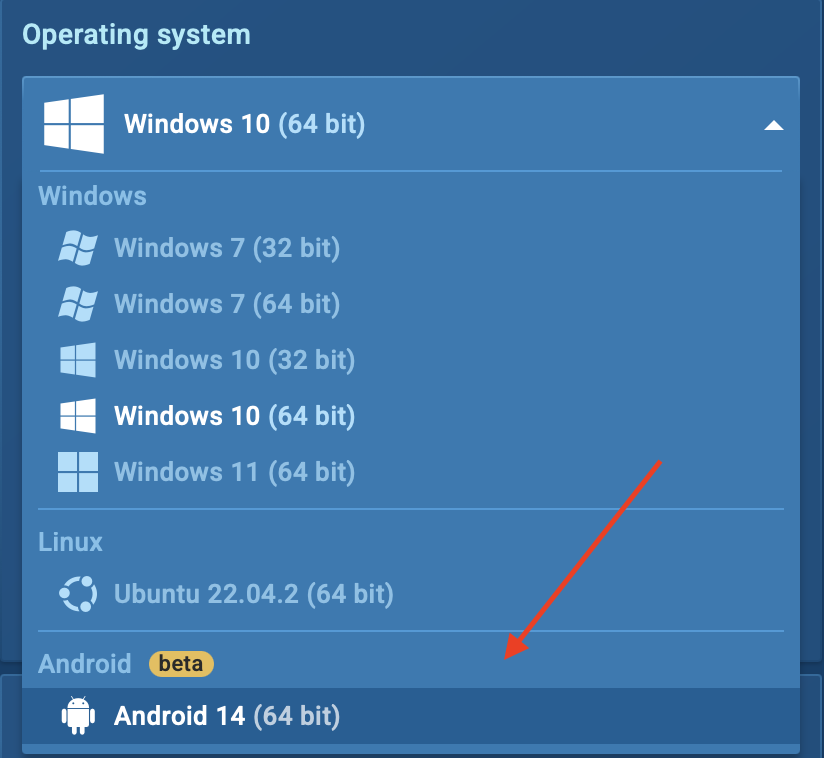
  1. Select Android OS – Before launching an analysis, choose Android from the operating system menu. 
  1. Upload the APK file – Drag and drop the file into the sandbox. 
  1. Start the investigation – Run the file and observe its behavior in real time. 

Give your security team the speed to analyze APK files and detect threats instantly with ANY.RUN Interactive Sandbox 


Sign up for free


See It in Action: Analyzing Mobile Malware Inside ANY.RUN’s Android Sandbox 

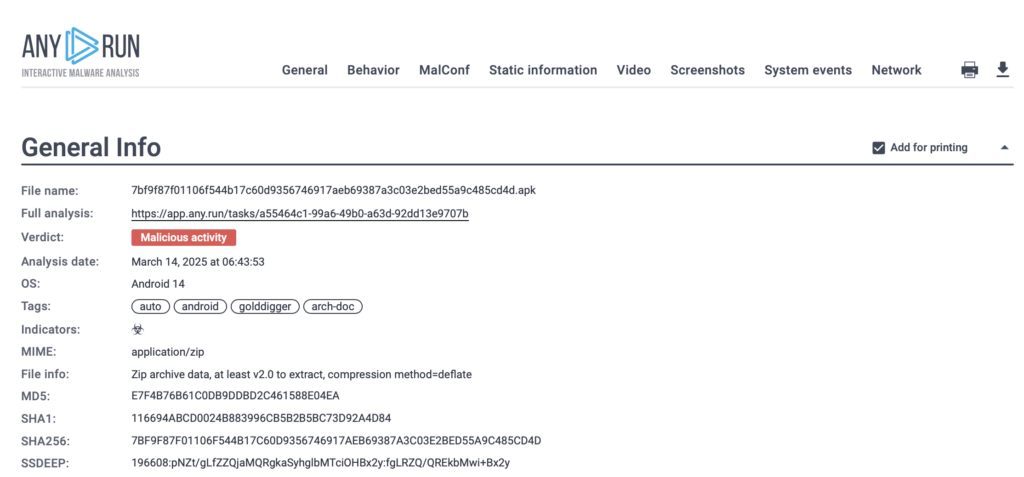
Let’s look at real-world malware cases to see how ANY.RUN’s interactive sandbox makes Android threat analysis easier and more effective. 

One notorious Android malware family is Coper, a banking trojan that targets financial apps, steals user credentials, and intercepts SMS messages. Attackers use it to bypass two-factor authentication (2FA) and take full control of compromised devices. 

With ANY.RUN’s Android OS sandbox, we can break down exactly how this malware behaves in real time. 

View analysis session 

Coper analyzed inside Android OS

Instant Detection with Interactive Analysis 

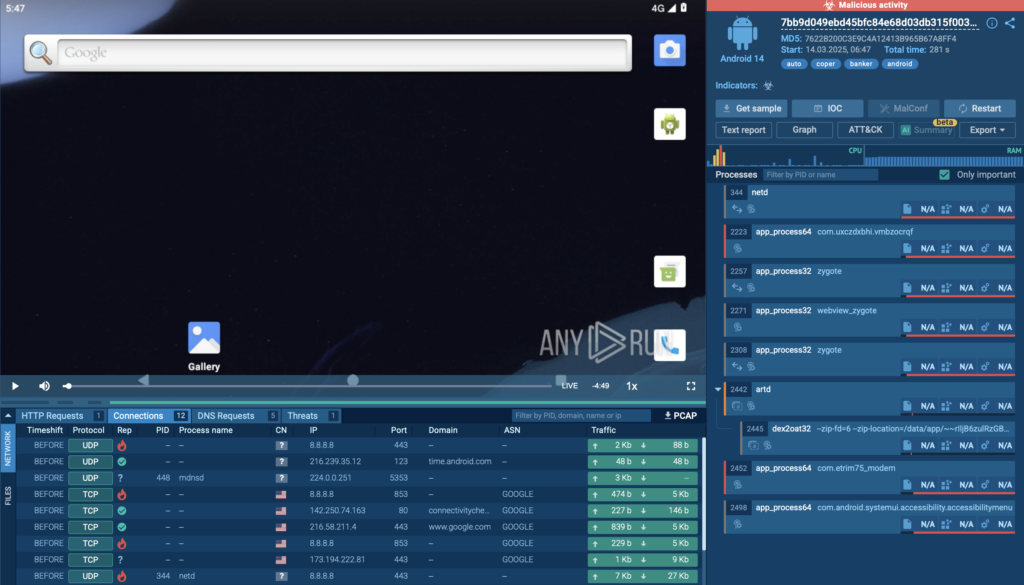
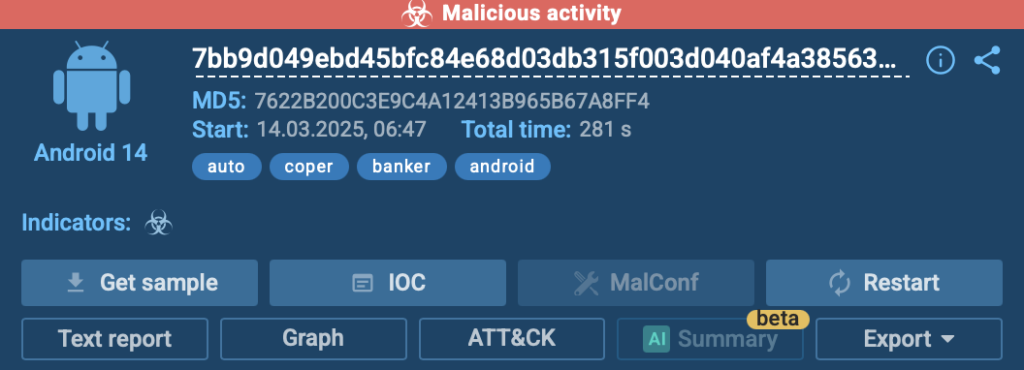
The first thing you’ll notice after running an analysis is that ANY.RUN immediately flags suspicious activity. In this case, we see a red alert in the top right corner, signaling that the APK file is performing dangerous actions. 

Fast detection of malicious activities 

Since the sandbox is fully interactive, we can engage with the app just like on a real Android device. This means: 

✔ Opening the malware-infected app and seeing how it behaves 
✔ Granting or denying permissions to observe how it reacts 
✔ Triggering functions like keylogging to uncover hidden actions 

Digging into the Tree of Processes 

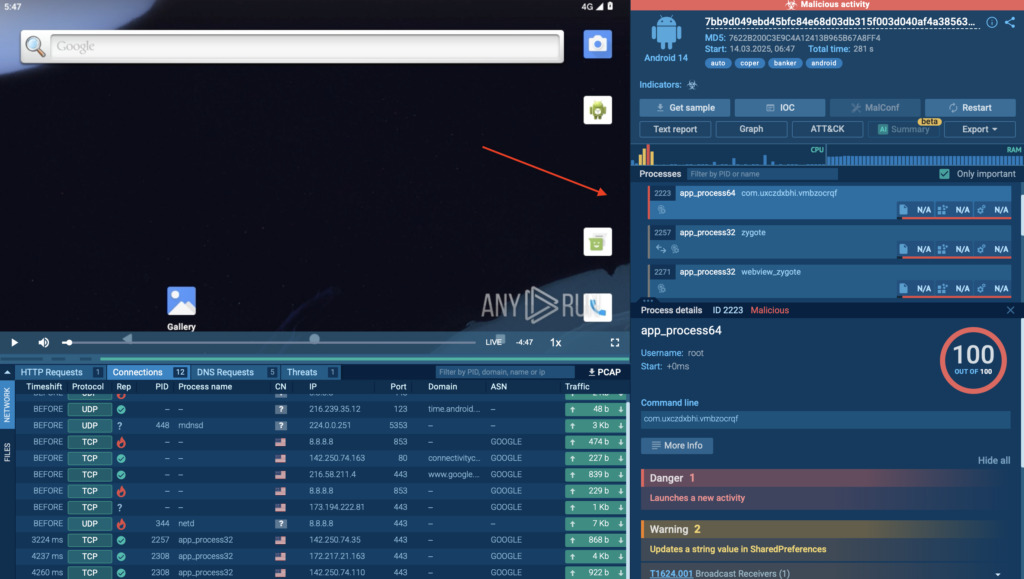
To understand how Coper operates under the hood, we check the Process Tree section, which provides a structured breakdown of all executed processes. 

Here, you can: 

  • See which processes are spawned by the malware 
  • Identify connections to suspicious services or commands 
  • Detect any attempts to gain persistence or execute additional payloads 

The Process Tree is located in the right part of the analysis screen, giving a clear and organized view of how the APK interacts with the system.  

Instead of manually tracking logs, security teams get a clear breakdown of malicious actions in a simple, visual format. 

Malicious process carried out by Coper inside ANY.RUN sandbox 

Understanding the Attack Tactics with MITRE ATT&CK Mapping 

Next, we head to the MITRE ATT&CK Matrix section, which helps map out exactly what techniques and tactics Coper is using. 

Inside ANY.RUN, this can be found under the MITRE ATT&CK tab, where you get a structured breakdown of: 

  • The specific attack techniques used (e.g., credential theft, keylogging, SMS interception) 
  • The broader tactics the malware follows (e.g., persistence, privilege escalation) 
  • Links to detailed explanations for deeper research 
MITRE ATT&CK techniques and tactics used by Coper

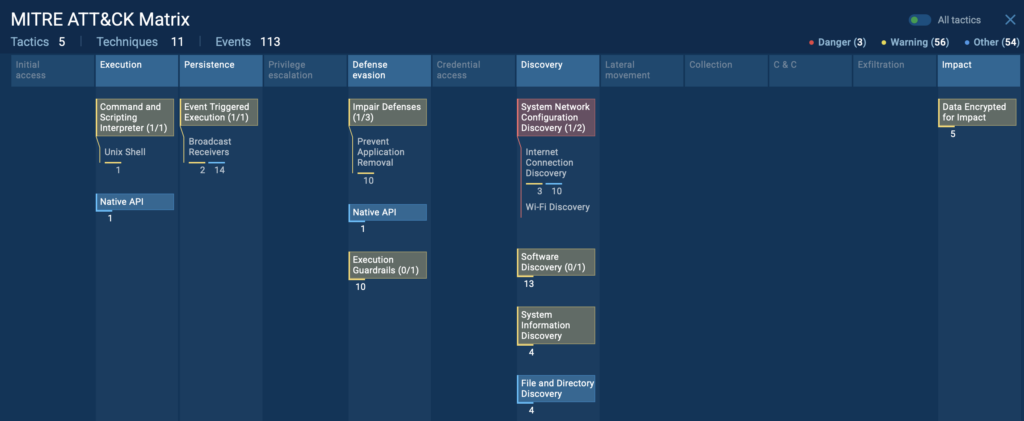
By clicking on any technique, you get a detailed description of how the attack works, making it easier to correlate threats and improve security defenses. 

Technique details inside Android sandbox 

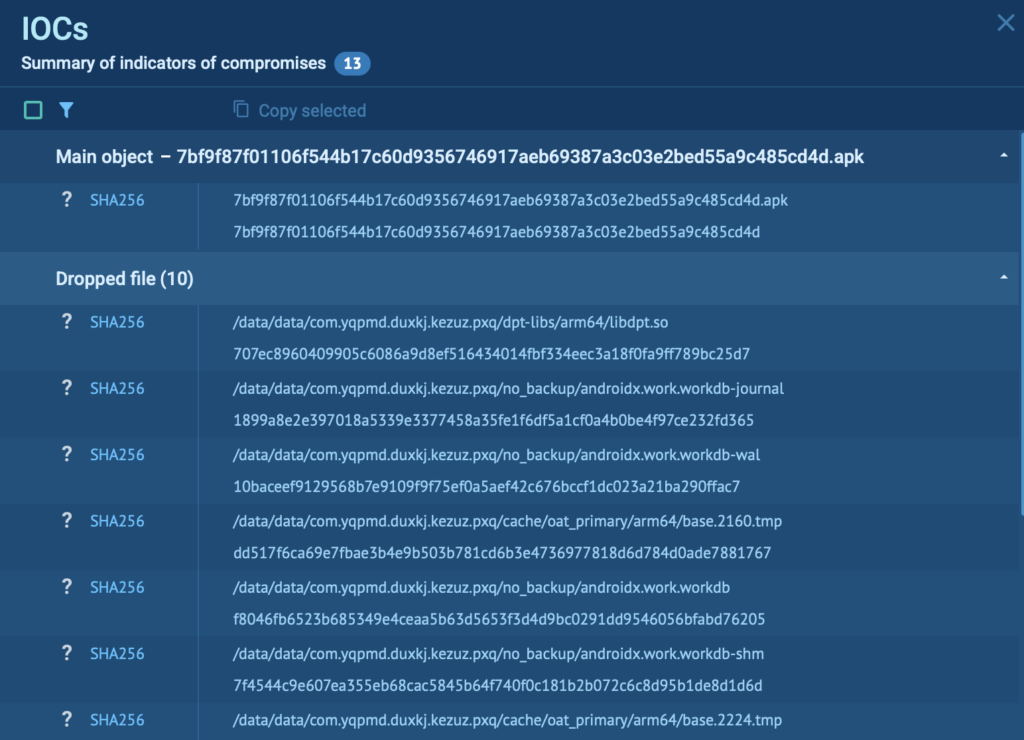
Collecting IOCs for Threat Intelligence 

Once the analysis is complete, ANY.RUN generates structured, in-depth reports, allowing SOC teams to get: 

  • Malicious URLs and IP addresses 
  • Dropped or modified files 
  • Registry changes and system modifications 

These IOCs can be exported and shared for further action, helping organizations update security rules, improve detection, and prevent future infections. 

In this analysis of GoldDigger malware, we can see a collection of useful IOCs by clicking the “IOC” button in the top right corner of the screen. 

IOCs for further analysis collected inside ANY.RUN’s Android sandbox

Generating a Structured Report for Easy Sharing 

Once the analysis is complete, it’s time to generate a detailed report. In ANY.RUN, this can be done in the Reports section, allowing SOC teams to: 

✔ Quickly escalate cases with clear, organized evidence. 
✔ Share findings across teams for improved collaboration. 
✔ Enhance future detection strategies using real-world behavioral data. 

Report generated inside interactive sandbox

Having a clear, documented report helps SOC teams, threat hunters, and incident responders work more efficiently, ensuring that findings are communicated effectively across teams. 


ANY.RUN cloud interactive sandbox interface

Sandbox for Businesses

Discover all features of the Enterprise plan designed for businesses and large security teams.


Turn Your Team’s Hours of Android Malware Investigation into Minutes 

ANY.RUN’s Android OS support is a whole new way to investigate mobile threats with speed and precision.  

Whether your security team is tackling incident response, malware research, or threat hunting, this release helps businesses detect Android threats easier, cut investigation time, and strengthen security operations. 

  • It’s fast – No waiting for static scans or manual reverse engineering. See how an APK behaves in seconds 
  • It’s interactive – Click, explore, and engage with malware just like you would on a real Android device. 
  • It’s detailed – Track every action with process trees, MITRE ATT&CK mapping, and real-time network insights. 
  • It’s fully cloud-based – Run Android malware investigations anytime, anywhere, without worrying about infrastructure. 
  • It’s built for teams – Generate structured reports, share findings, and collaborate on investigations seamlessly. 

Start your first Android analysis today and experience the precision of mobile malware analysis inside a real ARM-based sandbox. 

About ANY.RUN 

ANY.RUN helps more than 500,000 cybersecurity professionals worldwide. Our interactive sandbox simplifies malware analysis of threats that target both Windows and Linux systems. Our threat intelligence products, TI LookupYARA Search, and Feeds, help you find IOCs or files to learn more about the threats and respond to incidents faster. 

Request free trial of ANY.RUN’s services → 

The post Expose Android Malware in Seconds: ANY.RUN Sandbox Now Supports Real-Time APK Analysis  appeared first on ANY.RUN’s Cybersecurity Blog.

ANY.RUN’s Cybersecurity Blog – ​Read More

TikTok rolls out a new Security Checkup tool. Here’s how it works

Are the company’s new security features enough to quiet the anti-TikTok voices?

Latest stories for ZDNET in Security – ​Read More

ChatGPT Vulnerability Exploited Against US Government Organizations

A year-old vulnerability in ChatGPT is being exploited against financial entities and US government organizations.

The post ChatGPT Vulnerability Exploited Against US Government Organizations appeared first on SecurityWeek.

SecurityWeek – ​Read More

Supply chain attack via GitHub Action | Kaspersky official blog

Attacks on open-source mostly start with publishing new malicious packages in repositories. But the attack that occurred on March 14 is in a different league — attackers compromised the popular GitHub Action tj-actions/changed-files, which is used in more than 23,000 repositories. The incident was assigned CVE-2025-30066.  All repositories that used the infected changed-files Action are susceptible to this vulnerability. Although the GitHub administration blocked changed-files Action and then rolled it back to a safe version, everyone who used it should conduct an incident response, and the developer community should draw more general lessons from this incident.

What are GitHub Actions?

GitHub Actions are workflow patterns that simplify software development by automating common DevOps tasks. They can be triggered when certain events (such as commits) occur at GitHub. GitHub has a kind of app-store where developers can take a ready-made workflow process and apply it to their repository. To integrate such a ready-made GitHub process into your CI/CD development pipeline, you only need one line of code.

changed-files compromise incident

On March 14, the popular tj-actions/changed-files GitHub Action — used to get any changed files from a project — was infected with malicious code. The attackers modified the process code and updated the version tags to include a malicious commit in all versions of changed-files GitHub Action. This was done on behalf of the Renovate Bot user, but according to current information the bot itself wasn’t compromised; it was just a disguise for an anonymous commit.

The malicious code in changed-files is disguised as the updateFeatures function, which actually runs a malicious Python script and dumps the Runner Worker process memory, then searches it for data that looks like secrets (AWS, Azure and GCP keys, GitHub PAT and NPM tokens, DB accounts, RSA private keys). If something similar is found, it’s written to the repository logs. Both the malicious code and the stolen secrets are written with simple obfuscation — double base64 encoding. If the logs are publicly available, attackers (and not only the operators of the attack, but anyone!) can freely download and decrypt this data. On March 15, a day after the incident was discovered, GitHub deleted the changed-files process, and the CI/CD processes based on it may have not functioned. After another eight hours, the process repository was restored in a “clean version”, and now changed-files is working again without surprises.

Incident Response

Since logs in public repositories are accessible to outsiders, they’re the most likely to have been affected by the leak. However, in an enterprise environment, relying solely on the assumption that “all our repositories are private” is also not a good idea. Companies often have both public and private repositories, and if their CI/CD pipelines use overlapping secrets, attackers can still use this data to compromise container registries or other resources. Containers or packages built by popular open-source projects can also be compromised in this scenario.

The authors of the ill-fated changed-files recommend analyzing GitHub logs for March 14 and 15. If unusual data is found in the changed-files subsection, it should be decoded to understand what information may have been leaked. Additionally, it’s worth examining GitHub logs for this period for suspicious IP addresses. All changed-files users are advised to replace secrets that could have been used in the build and leaked during this period. First of all, you should pay attention to repositories with public CI logs, and secondly, to private repositories.

In addition to replacing potentially compromised secrets, it’s recommended to download the logs for subsequent analysis, and then clear their public versions.

Lessons from the incident

The complexity and variety of attacks on the supply chain in software development are growing: we’ve already become accustomed to attacks in the form of malicious repositories, infected packages and container images, and we’ve encountered malicious code in test cases — and now in CI/CD processes. Strict information-security hygiene requirements should extend to the entire life-cycle of an IT project.

In addition to the requirement to strictly select the source code base of your project (open source packages, container images, automation tools), a comprehensive container security solution and a secrets management system are necessary. Importantly, the requirements for special handling of secrets apply not only to the project’s source code, but also to the development processes. GitHub has a detailed guide on securely configuring GitHub Actions — the largest section of which is devoted specifically to handling secrets.

Kaspersky official blog – ​Read More

Microsoft Warns of StilachiRAT: A Stealthy RAT Targeting Credentials and Crypto Wallets

Microsoft is calling attention to a novel remote access trojan (RAT) named StilachiRAT that it said employs advanced techniques to sidestep detection and persist within target environments with an ultimate aim to steal sensitive data.
The malware contains capabilities to “steal information from the target system, such as credentials stored in the browser, digital wallet information, data stored

The Hacker News – ​Read More

Bypassing Web Filters Part 3: Domain Fronting

The last two blog posts in this series were about SNI spoofing and Host header spoofing. We also learned that the latter is addressed by some vendors with a technique called “Domain Fronting Detection”. But what exactly is domain fronting? This will be explained in this blog post.

Bypassing web filters blog post series overview:

Content Delivery Networks / Caching Servers

Let’s first discuss what a CDN is used for. A simple CDN could look like this:

Alice requests a file. The CDN server fetches it from the content servers and delivers it.

There are 3 content servers. These are used to serve content to users. Because these servers are not very powerful and only have a slow uplink, they would not be able to serve files to millions of users. Instead of adding more servers and more bandwidth to the content servers, a CDN server is placed in front of them, to offload the work.

The DNS records (e.g. b.example.net) of the content servers point to the CDN server (203.0.113.5). Now, when Alice wants to access a file from b.example.net, the request is sent to the CDN server’s IP address with both the SNI and Host header set to b.example.net. As long as this domain is registered at the CDN, the server then checks if the file is already in its cache and if not, fetches it from the respective content server.

If the same resource is requested again from the CDN server, the resource is directly loaded from the cache:

Bob requests the same file as Alice. The CDN server responds with the cached file.

This saves computing power and bandwidth on the content servers. The CDN servers can also exist simultaneously in multiple locations distributed over the world, for even better content delivery speed.

Bypassing Simple Web Filters Using Domain Fronting

Domain fronting is a technique used to bypass censorship and web filters1. This technique is not only useful to bypass web filters but also to enhance the legitimacy of traffic, allowing it to seamlessly blend into regular network activity.

It uses the fact that the hostname can be specified on two places in an HTTPS request. In the SNI during the TLS handshake, and in the Host header of the HTTP request, as we have already seen in the two previous blog posts.

As a short recap, in a legitimate CDN scenario, a user’s request contains the target hostname (the server behind the CDN) in both the SNI and in the Host header. With domain fronting, the SNI is set to a legitimate hostname (e.g. one that is allowed to be accessed), but the Host header is set to a server that should not be directly accessible.

For this to work, the server that handles this connection must be configured to correctly evaluate the hostname in the Host header and respond to it. This is where CDNs come into play, since that is essentially their job.

Imagine you have the following situation where Alice is able to access the CDN cdn.example.net which is used in turn to access legit.example.net. However, access to evil.example.com is blocked by the firewall based on the SNI evil.example.com:

Connection is blocked to evil.example.com

An attacker can now use the CDN network to “hide” their server behind it. Now, Alice (or a malware on her computer) can send a request to the allowed CDN server 203.0.113.5 with the legitimate SNI legit.example.net but with the Host header set to the blocked server evil.example.com. Because the CDN is configured accordingly, the request is forwarded to the evil.example.com server which allows Alice to access this otherwise blocked resource.

The evil system can be accessed via the CDN, using a legit SNI but evil hostname in Host header

The final IP, TLS and HTTP packet structure looks like this:

Domain Fronting

This looks similar to SNI spoofing (see the first part of this blog post series), but the connection is established to a legitimate CDN system and not directly to the blocked host.

Example Using Fastly CDN and curl

Choose Your CDN

Since domain fronting is a well-known technique, it does not work on all CDNs. There are several CDNs that check whether the hostnames in the SNI and Host header are different and then block such requests. This is the case for example on Azure2, Google3, or AWS4. In contrast, Fastly5 does (at the time of writing this blog) not block domain fronting.

Evil Server Configuration

This is the easiest part. A webserver was configured on evil.meta.securelogon.ch. that serves some content:

$ curl https://evil.meta.securelogon.ch
<h1>Hello from Compass</h1>

For this example, it is assumed that the access to this server is blocked.

Fastly Configuration

Let’s create a new CDN service in Fastly. Choose anything you want for the domain name, e.g. compass-test.global.ssl.fastly.net ①. This domain name is later used in the Host header. For the origin, the system evil.meta.securelogon.ch – which is under our control – is configured ②:

CDN service setup on Fastly

After this, you have a new domain name with the following DNS entry:

$ dig compass-test.global.ssl.fastly.net +noall +short
199.232.17.194

This domain name can now be used to access your system:

$ curl https://compass-test.global.ssl.fastly.net/
<h1>Hello from Compass</h1>

Side note: At this point we would already have achieved a simple bypass, as our newly registered domain may not be blocked by the web filter we try to bypass. However, this could easily be rectified by the operator of the filter, by simply blocking this new domain (for example because it is newly observed, or only accessed very infrequently).

But let’s get back to our setup. If we look at the request from the above curl command in details, you can see that both the SNI ① in the TLS handshake and the Host header ③ in the HTTP request ② contain the Fastly hostname compass-test.global.ssl.fastly.net:

Request to new CDN service

This is the typical way of accessing resources via a CDN and does not yet indicate, whether Fastly can be used for domain fronting. For this, we have to figure out, if Fastly also accepts requests where the SNI and Host header differ, and if serves the correct content.

Let’s use our previously configured hostname as Host header and set an arbitrary SNI (in this case even a non-valid domain for testing purposes). As you can from the response below, the server is indeed accessible:

$ curl -k -H "Host: compass-test.global.ssl.fastly.net" --connect-to invalid::199.232.17.194: https://invalid/
<h1>Hello from Compass</h1>

Note that in this curl request, certificate validation is disabled explicitly (-k). Since Fastly is not able to serve a valid certificate for https://invalid, our request would fail otherwise.

In Wireshark, the above request looks as follows. The SNI ① in the TLS handshake is set to invalid, but the the Host header ③ in the HTTP request ② contain the Fastly hostname compass-test.global.ssl.fastly.net:

Request to CDN via invalid SNI

This behavior tells us, that the Fastly CDN service:

  1. does not check whether the hostname in the SNI and Host header match
  2. delivers the content solely based on the Host header

Therefore, the Fastly CDN fulfills the basic requirements for domain fronting.

Finding Frontable Domains

As mentioned previously, domain fronting aims at bypassing web filters, but also at being stealthy. The stealth party mainly relates to the hostname used as SNI. Therefore, we now have to look for suitable domains.

Let’s define our requirements for these domains:

  • The hostname must be registered at the target CDN (in our case Fastly)
  • The hostname must not be blocked by the web filter in question
  • (Bonus) The hostname should not be suspicious in context of your target environment

If a domain uses a CDN to deliver its content, the DNS records for this domain point to one or more servers belonging to the CDN. There are several tools like FindFrontableDomain6 which help you to check if a domain is behind a known CDN, as well as lists that contain well-known frontable domains7. But let’s do this manually, so you can see the process behind.

First, you have to come up with existing hostnames that would suit the target infrastructure you are testing (remember that the domain should be allowed by the target web filter, and ideally should not raise suspicion). For a bank, you could e.g. enumerate the subdomains of some financial websites. As a starting point, you could use a public lists of widely used domains, for example from one8 of several GitHub repositories, or from DomCop9. To blend in with your target infrastructure, you could also enumerate hostnames of your target itself.

Next, we perform a DNS lookup on these hostnames and check if the DNS record points to the Fastly CDN. The following command uses dnsx10 to resolve the DNS entries. This is useful, since dnsx is also able to show which CDN is used:

$ dnsx -silent -resp -cname -a -cdn < possible-hostnames.txt
[...]
amazon.com [A] [205.251.242.103]                                                                                               
amazon.com [A] [54.239.28.85]                                                                                                  
creators.spotify.com [A] [151.101.194.133]  [fastly]
creators.spotify.com [A] [151.101.66.133]  [fastly]
creators.spotify.com [A] [151.101.2.133]  [fastly]
creators.spotify.com [A] [151.101.130.133]  [fastly]
dailymotion.com [A] [195.8.215.136]    
deezer.com [A] [13.224.103.100]  [cloudfront]                                                                                  
deezer.com [A] [13.224.103.83]  [cloudfront]                                                                                   
de.wikipedia.org [A] [185.15.58.224]                                                                                            
[...]                                                               
paypal.com [A] [151.101.195.1]  [fastly]                                                                                       
paypal.com [A] [151.101.3.1]  [fastly]                                                                                         
paypal.com [A] [162.159.141.96]  [fastly]                                                                                      
paypal.me [A] [151.101.65.21]  [fastly]                                                                                        
paypal.me [A] [162.159.141.96]  [fastly]                                                                                       
pbs.twimg.com [A] [104.18.37.127]  [fastly]                                                                                    
pbs.twimg.com [A] [172.64.150.129]  [fastly]                                                                                                                                              
trello.com [A] [3.165.190.47]                                                                                                  
[...]

Nice, there are several hostnames that resolve to the Fastly CDN. Sometimes, CDNs have multiple exposed systems and not all of them can be used to access the same targets. To check if our server with the domain compass-test.global.ssl.fastly.net can be reached, we can perform an HTTP request to all discovered hostnames and verify whether our self-hosted website (with the content “Hello”) can be accessed:

$ grep fastly dnsx_top10m_all.txt | cut -d ' ' -f 1 | sort -u | while read host
do
  curl -s -H "Host: compass-test.global.ssl.fastly.net" https://$host/ | grep -q "Hello" && echo $host
done
ameblo.jp
anchor.fm
creators.spotify.com
dictionary.com
linktr.ee
slate.com
smh.com.au
theatlantic.com

Note: These hostnames do not necessarily need to resolve to the exact same IP address as our Fastly domain, they just have to be part of the CDN:

$ dig creators.spotify.com +noall +answer
creators.spotify.com.   204     IN      A       151.101.130.133
creators.spotify.com.   204     IN      A       151.101.194.133
creators.spotify.com.   204     IN      A       151.101.66.133
creators.spotify.com.   204     IN      A       151.101.2.133

$ dig compass-test.global.ssl.fastly.net +noall +answer
compass-test.global.ssl.fastly.net. 36 IN A     199.232.17.194

Domain Fronting Using curl

Now, we can combine these elements to craft a request that includes a previously discovered hostname in the SNI while using our own Fastly domain in the Host header. Curl resolves creators.spotify.com to the IP address 151.101.2.133 and includes this hostname in the SNI. Since the CDN server manages this hostname, it provides a valid certificate for the TLS connection. However, the response we get is dictated by our malicious hostname in the Host header.

$ curl -v -H "Host: compass-test.global.ssl.fastly.net" https://creators.spotify.com/index.html
[...]

* SSL connection using TLS1.2 / ECDHE_RSA_CHACHA20_POLY1305
*   server certificate verification OK
*   server certificate status verification SKIPPED
*   common name: creators.spotify.com (matched)
    [...]
*   subject: CN=creators.spotify.com
    [...]
*   issuer: C=US,O=Certainly,CN=Certainly Intermediate R1

[...]
* Connected to creators.spotify.com (151.101.2.133) port 443
* using HTTP/1.x

> GET / HTTP/1.1
> Host: compass-test.global.ssl.fastly.net
[...]

< HTTP/1.1 200 OK
[...]

<h1>Hello from Compass</h1>

In Wireshark, we can retrace all steps of this connection. First, a DNS lookup is performed for the the legititimate hostname creators.spotify.com ①. Then the TLS connection is established with the legitimate hostname in the SNI ②. In the wrapped HTTP request ③, the Host header ④ has the value of compass-test.global.ssl.fastly.net:

Request to CDN using legitimate SNI but evil hostname in Host header

From a network perspective, the traffic appears legitimate for the destination host creator.spotify.com. However, it was possible to fetch a resource from another system which would otherwise be blocked.

Non-Working Example Using AWS CloudFront

As already mentioned, some CDNs block domain fronting. AWS CloudFront is one example.

To demonstrate this behavior, we use two hostnames that resolve to the same IP address of the AWS CloudFront CDN:

$ dnsx -silent -resp -cname -a -cdn < possible-hostnames.txt | sort -k3
[...]
marketwatch.com [A] [18.165.183.55]  [cloudfront]
nationalgeographic.com [A] [18.165.183.55]  [cloudfront]
[...]

When a request is made where the SNI does not match the hostname in the Host header, CloudFront detects this mismatch and blocks the request with the following error message:

$ curl --connect-to nationalgeographic.com::18.165.183.55: -H "Host: marketwatch.com." https://nationalgeographic.com/
[...]
<H1>421 ERROR</H1>
<H2>The request could not be satisfied.</H2>
The distribution does not match the certificate for which the HTTPS connection was established with.
[...]

Domain Fronting Protection and Limitations

Domain fronting can be detected by web filters – as with Host header spoofing – by comparing if the hostname in the SNI and in the Host header are identical. However, just by looking at the TLS traffic, it’s not possible to identify that another system is accessed, because both the destination IP address and the hostname in the SNI look legit, and even a valid certificate is used (the one matching the SNI).

In the previous part of this series about Host Header Spoofing, an example of this detection mechanism in Fortinet FortiGuard was already explained. Other products, such as Paloalto PAN-OS are also equipped with this feature11:

Domain fronting detection feature in PAN-OS

Takeaway

So this is another technique to bypass web filters that is worth testing in your environment or in your next penetration test.

Domain Fronting is quite similar to SNI spoofing, as it involves spoofing a legitimate hostname in the SNI. However, in this case, the connection is made to a legitimate system where the hostname in the SNI matches the Subject/SANs of the certificate, ensuring the presence of a valid certificate.

From an attacker’s perspective, it’s still no almighty bypass. If the proxy inspects the TLS traffic and performs proper checks, such attacks can be detected and prevented.

However, these prevention techniques are not golden and can sometimes be bypassed as well. This will be explained in the next blogpost.

References

  1. Blocking-resistant communication through domain fronting (paper, including presentation and video): https://www.bamsoftware.com/papers/fronting/ ↩
  2. Microsoft: Securing our approach to Domain Fronting within Azure: https://www.microsoft.com/en-us/security/blog/2021/03/26/securing-our-approach-to-domain-fronting-within-azure/ ↩
  3. Ars Technica: Google disables “domain fronting” capability used to evade censors: : https://arstechnica.com/information-technology/2018/04/google-disables-domain-fronting-capability-used-to-evade-censors/ ↩
  4. Enhanced Domain Protections for Amazon CloudFront Requests: https://aws.amazon.com/blogs/security/enhanced-domain-protections-for-amazon-cloudfront-requests/ ↩
  5. Fastly: https://www.fastly.com/ ↩
  6. GitHub: rvrsh3ll/FindFrontableDomain: https://github.com/rvrsh3ll/FindFrontableDomains/ ↩
  7. GitHub: vysecurity/DomainFrontingLists: https://github.com/vysecurity/DomainFrontingLists ↩
  8. GitHub: PeterDaveHello/top-1m-domains: https://github.com/PeterDaveHello/top-1m-domains ↩
  9. DomCop: https://www.domcop.com/top-10-million-websites ↩
  10. GitHub: projectdiscovery/dnsx: https://github.com/projectdiscovery/dnsx ↩
  11. Paloalto PAN-OS Documentation, Domain Fronting Detection: https://docs.paloaltonetworks.com/pan-os/10-2/pan-os-new-features/content-inspection-features/domain-fronting-detection ↩

Compass Security Blog – ​Read More

How to Permanently and Securely Delete Photos from an iPhone

Do you need to permanently and securely delete photos from an iPhone to prevent unauthorized access? Simply deleting…

Hackread – Latest Cybersecurity, Tech, AI, Crypto & Hacking News – ​Read More

Google revives talks to acquire Wiz at higher valuation

Google’s parent company Alphabet is again in advanced talks to acquire cloud cybersecurity startup Wiz, a person familiar with the deal told TechCrunch. The two companies were close to securing a deal at a $23 billion valuation last summer, but the transaction failed to materialize.  This time, the price being discussed is higher, the person […]

© 2024 TechCrunch. All rights reserved. For personal use only.

Security News | TechCrunch – ​Read More

iPhone-Android: A Major Privacy Upgrade is Coming Soon

This breakthrough will finally allow secure, encrypted messaging between different mobile platforms.

Security | TechRepublic – ​Read More

Lexmark Expands Print Security Services Worldwide

Post Content

darkreading – ​Read More