
Technical Analysis of Ducex: Packer of Triada Android Malware
Many have probably heard of the modular malware for mobile devices called Triada. Even nine years after its first mention in 2016, it remains one of the most advanced Android trojans out there. Recently, our team at ANY.RUN came across an interesting sample of this malicious software. The sample in question was embedded in a fake Telegram app.
Since the capabilities of this threat have been extensively studied and described by other researchers, we focused on the packer used by the malware that we named Ducex.
Here’s a detailed breakdown of our analysis and key findings.
Key Takeaways
- Triada’s Android Packer: Ducex is an advanced Chinese Android packer found in Triada samples, whose primary goal is to complicate analysis and confuse the detection of its payload.
- Encrypted Functions: The packer employs serious obfuscation through function encryption using a modified RC4 algorithm with added shuffling.
- XORed Strings: Beyond functions, all strings used by Ducex are also encrypted using a simple sequential XOR algorithm with a changing 16-byte key.
- Debugging Challenges: Ducex creates major roadblocks for debugging. It performs APK signature verification, failing if the app is re-signed. It also employs self-debugging using fork and ptrace to block external tracing.
- Analysis Tool Detection: The packer actively detects the presence of popular analysis tools such as Frida, Xposed, and Substrate. If any of these tools are found in memory, the process terminates its execution.
- Payload Storage & Encryption: The Triada payload is uniquely stored within Ducex’s own classes.dex file in a large, additional section after the main application code, avoiding detection as separate files.
Initial Analysis
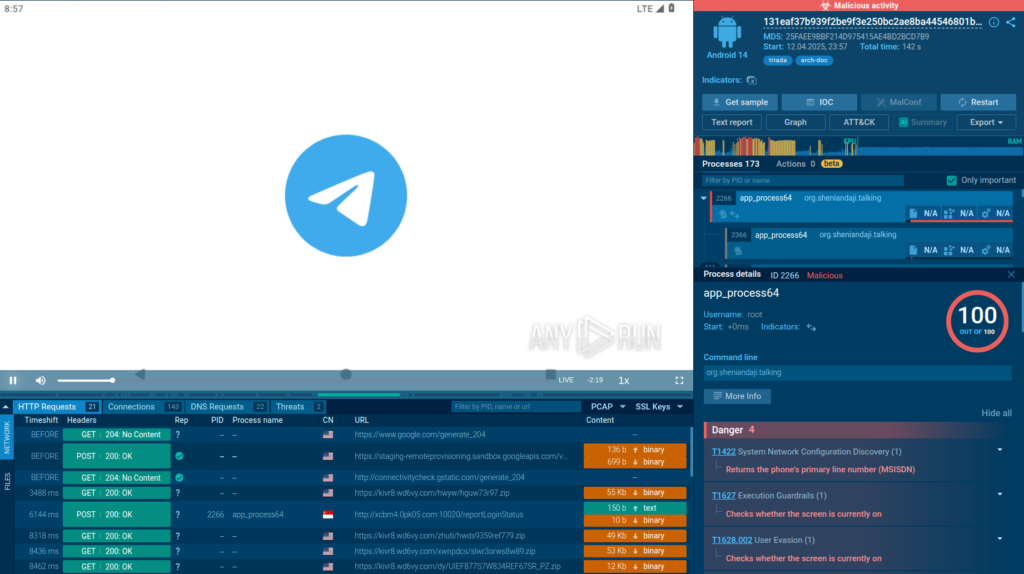
Our investigation began with the analysis of a Triada sample inside ANY.RUN’s Interactive Sandbox.
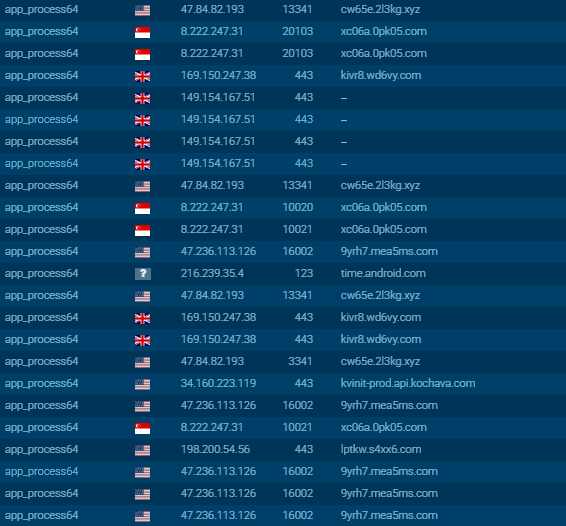
The service quickly identified the malware family, and we were able to confirm this by recognizing the characteristic domains it communicated with.
From there, we moved on to inspect the packer.
Why We Decided to Analyze Ducex
Not malicious itself, Ducex is still quite interesting. Its developers tried their best to complicate analysis as much as possible and confuse detection of the payload it carries using various techniques that will be discussed below.
We have not obtained the source code of this tool, so we relied exclusively on its reverse engineering. For the same reason, we gave it a name ourselves. Studying the classes in the code, we noticed that its authors used the word “Duce” a lot.

The library they utilize is called “libducex”. Based on this, we called the packer “Ducex”.
Ducex: The Architecture
Before proceeding to detailed analysis of the tool, let’s look at the general operation scheme of Ducex:
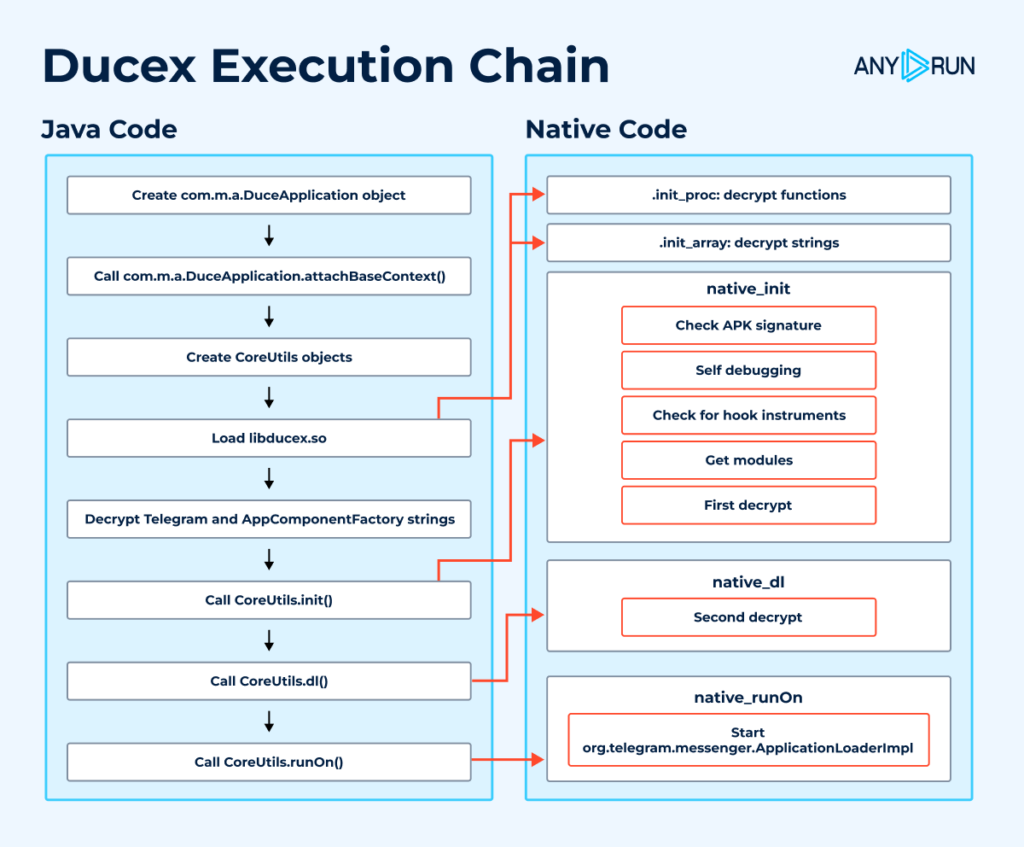
We have outlined all the stages of the tool’s execution; we will demonstrate and discuss them below in their interplay.
Analyzing App’s Java Code
When opening the malicious APK in an Android decompiler (e.g., JADX), the AndroidManifest shows the following data under the application tag:
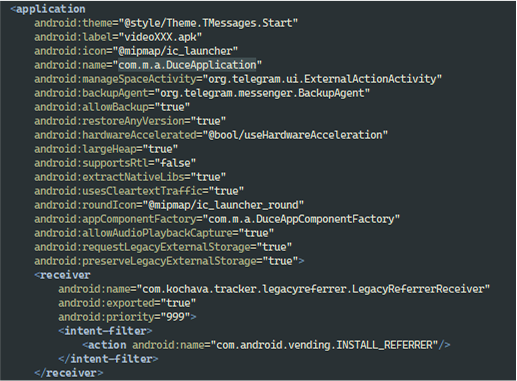
The com.m.a.DuceApplication class immediately catches our attention. It is specified in android:name, which means an instance of this class is created immediately after the application is launched. Going to its code, we see two methods: attachBaseContext() and onCreate().
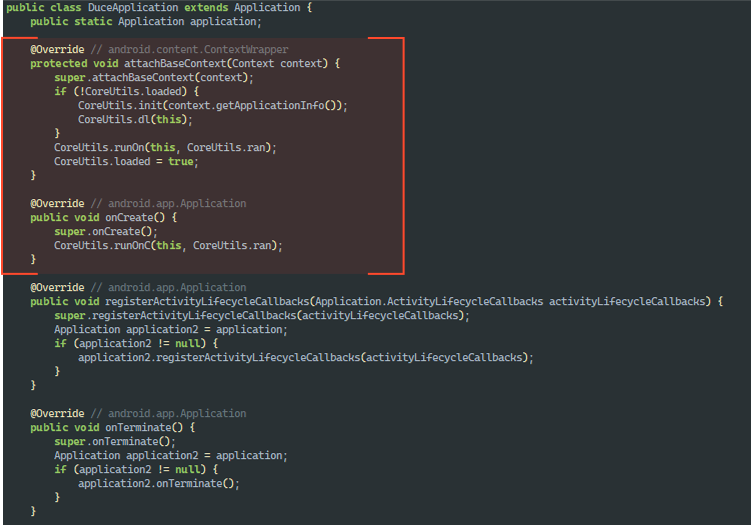
We are interested in these methods specifically, as they will be called when creating an instance of the class, in the specified order. Inside them, we see calls to methods of the CoreUtils class:
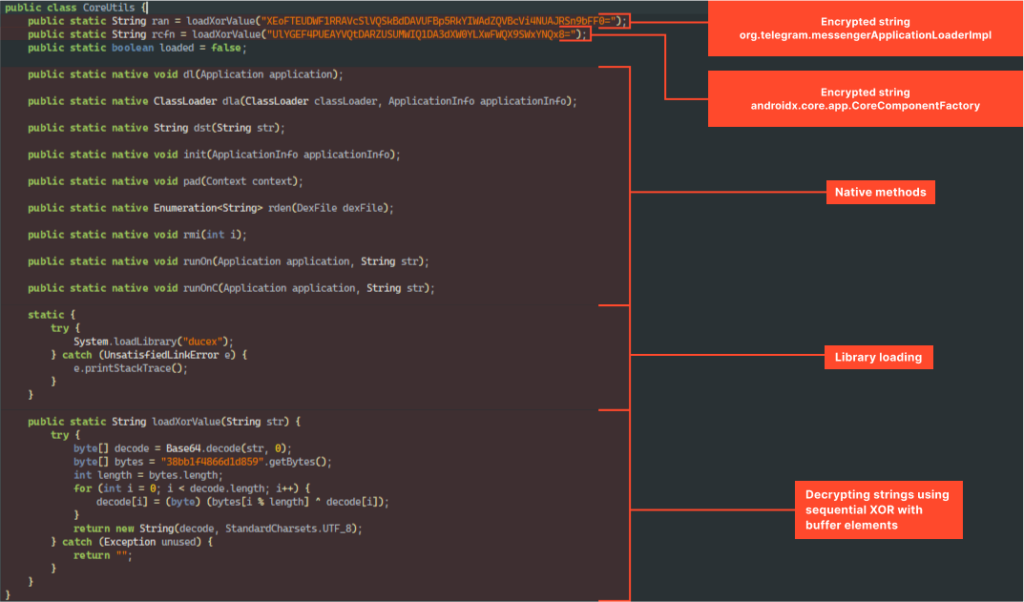
That’s where it gets interesting. As can be seen in the screenshot above, most methods of this class are native, and they are implemented in the “libducex.so” library.
Additionally, if we decrypt the presented strings, we get, respectively, “org.telegram.messenger.ApplicationLoaderImpl” and “androidx.core.app.CoreComponentFactory“.
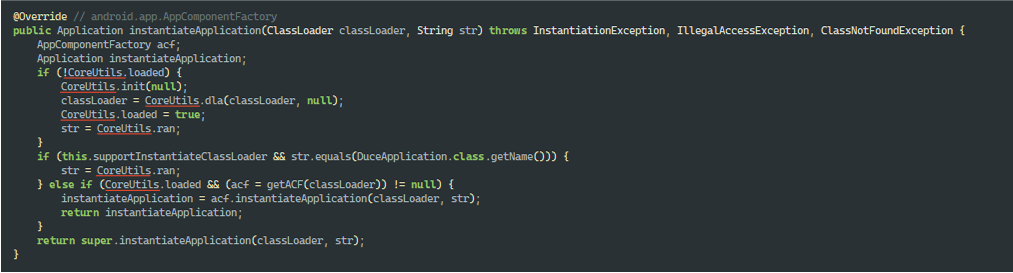
As can be seen in DuceApplication.onCreate() and DuceApplication.attachBaseContext(), it is org.telegram.messenger.ApplicationLoaderImpl that will be called to launch the fake Telegram using the CoreUtils.runOn() and CoreUtils.runOnC() methods, and androidx.core.app.CoreComponentFactory will be used in DuceAppComponentFactory, which overrides the creation of various application components (Application, Activity, etc.) to inject custom logic during their initialization using the same methods from CoreUtils:
Since the most interesting things happen in the libducex.so library, let’s proceed to its analysis.
Libducex.so Library Analysis
Encrypted Functions
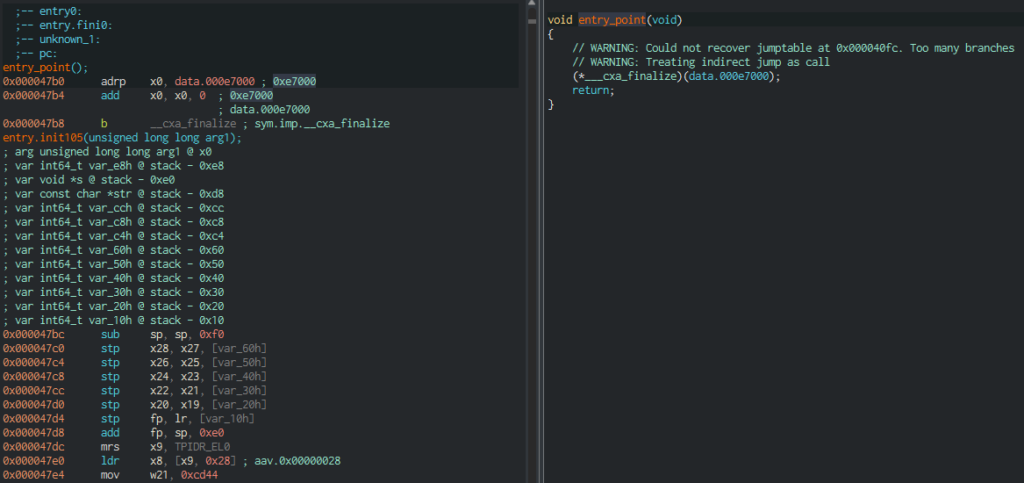
It turned out, you can’t just start analyzing the library. For example, the program entry point looks like this:
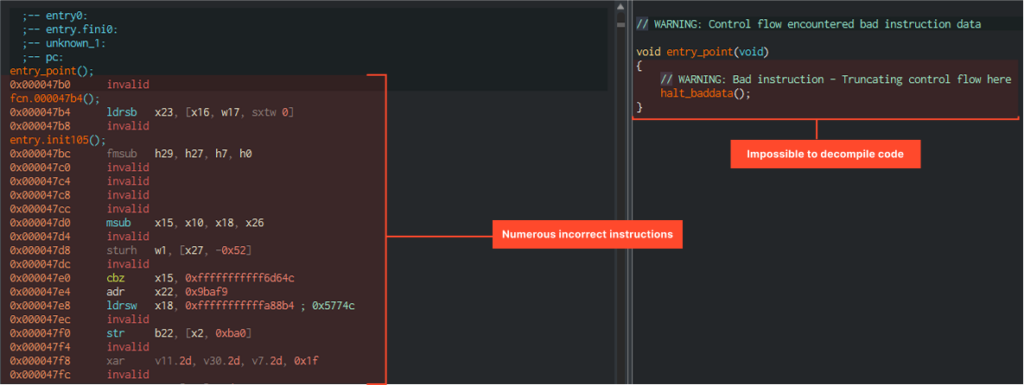
Most instructions are displayed incorrectly. It looks like very serious obfuscation or a completely non-working function. At this point we estimated what would be called even before the program entry point and moved to JNI_OnLoad.
JNI_OnLoad is called after the library is loaded into memory and the control is passed to the JVM.
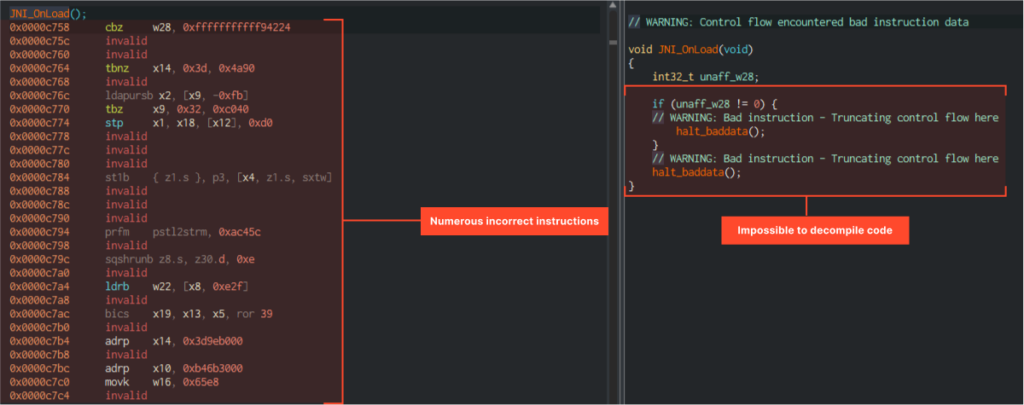
As we can see in the screenshot, the situation is exactly the same. The code looks non-working, which makes you think that it might not even be obfuscated but encrypted. So, if even JNI_OnLoad is encrypted, then we need to turn to functions that execute earlier than both it and Entry Point, which means before control is transferred to the JVM.
This function could be .init_proc, which executes immediately after loading the library into memory. And indeed, it was there that we found correct code capable of being decompiled:
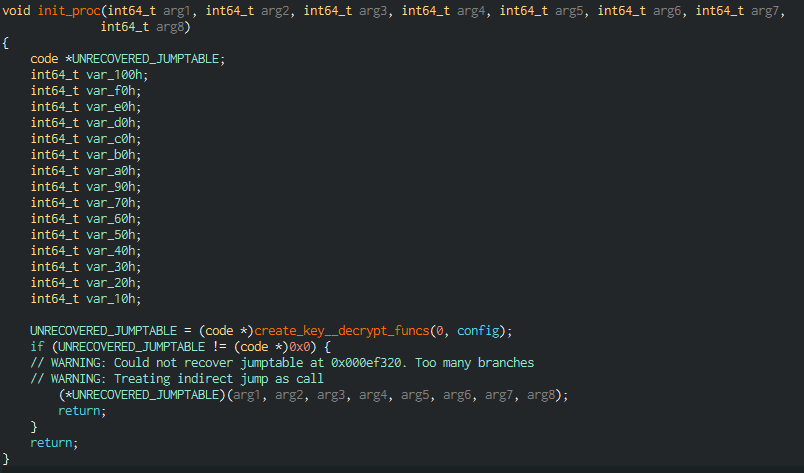
Getting a little ahead of ourselves, we’ll say that the functions were indeed encrypted, and their decryption occurs in .init_proc, in the nested create_key__decrypt_funcs function. Now back to the analysis.
The first thing that interests us is the configuration that is passed as the second argument to the function called in the figure above:
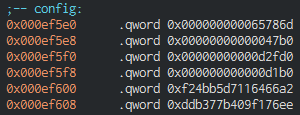
It consists of the following fields, presented in the same order as in the screenshot above:
- Magic value ‘mxe’;
- Decryption start address (in our case, Entry Point);
- Number of bytes for decryption;
- Function that will be called after completion of decryption;
- 16-byte buffer – key that will be used during decryption.
The decryption itself, occurring in create_key__decrypt_funcs, is carried out according to the configuration data. At first it seemed to us that the code had been encrypted using classic RC4, but this is not quite so. The developers slightly modified the algorithm by adding additional shuffling, so standard RC4 implementations didn’t work; we had to implement it ourselves.
Our decryption script takes a key as input, as well as the part of the file containing encrypted functions. The necessary parameters (the key, the start address of the encrypted part, and its size) are taken from the configuration described above.
def rc4_init(key):

    s = list(range(256))

    s += [0, 0]

    j = 0

    for i in range(256):
        key_byte = key[i & 0xf]
        j = (j + s[i] + key_byte) &0xff
        s[i], s[j] = s[j], s[i]

    return s


def rc4_process(s, encoded_data):

    i = s[256]

    j = s[257]

    output = bytearray(encoded_data)

    for n in range(len(encoded_data)):
        i = (i + 1) & 0xff
        a = s[i]
        j = (j + a) & 0xff
        b = s[j]
        s[i], s[j] = b, a
        output[n] ^= s[(a + b) & 0xff]

        for _ in range(2):
            i = (i + 1) & 0xff
            a = s[i]
            j = (j + a) & 0xff
            b = s[j]
            s[i], s[j] = b, a

    return bytearray(output)


def decrypt(key, func_buf):

    s = rc4_init(key)
	decoded_funcs = rc4_process(s, func_buf)
	return decoded_funcs
Applying the script to our library, we got the correct code. Entry Point, for example, now looks as follows:
Now all instructions are correct, and there are no problems with code decompilation.
Encrypted Strings
The encrypted functions, as it turned out, are not the only thing that developers decided to hide from the researcher’s eyes. All strings used by the packer are also encrypted. The algorithm is quite simple: it’s sequential XOR with a given key consisting of 16 bytes. The algorithm is unchanged throughout the entire sample, only the key changes. Example script with a given key:
def xor_data(data, key):

result = bytearray()

for i in range(len(data)):

result.append(data[i] ^ key[i % len(key)]) return result

key = b"GeGrE0tX`:0^6qLS"

encoded_buf = bytearray([0x1d, 0x0c, 0x37, 0x52, 0x2c, 0x5e, 0x12, 0x34, 0x01, 0x4e, 0x55, 0x5e])

decrypted = xor_data(encoded_buf, key)

print(decrypted)
In the output after running this simple script, you can see: bytearray(b’Zip inflatex00′).
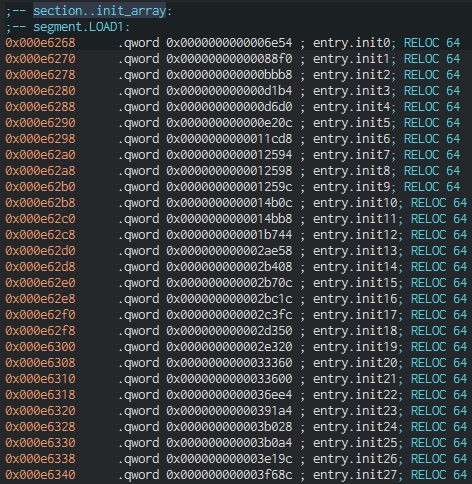
What’s interesting here is that all the functions used for decryption are called immediately upon initialization, not when required in the code. And the reference to the array with pointers to these functions is located, respectively, in .init_array, there are a huge number of them there:
Control Flow Obfuscation
In case the researcher breaks through the encryption, the developers have further obfuscated the code. For example, this is how the structure of the function in which native method names are decrypted looks:
And this is not even half of the function’s code, which could have been about 20 lines long. And all because of such constructions of cycles and conditions, which do not serve any purpose except to complicate the code:

At this point you might think that it would be enough to run the sample under a debugger and go through all these conditional jumps, see the decrypted functions and strings, but if only it were that simple.
APK Signature Verification
The first thing we attempted was to parse the APK using Apktool utility and insert the line android:debuggable=”true” under the application tag in AndroidManifest, then rebuild and sign the APK again.
Upon doing this in the smartphone settings, it’s possible to set up the application to wait for a debugger to connect. It also makes it possible to utilize the following command for adb: adb shell am set-debug-app -w –persistent <package>. On the next launch, a window “Waiting For Debugger” should appear and disappear after the debugger is connected.
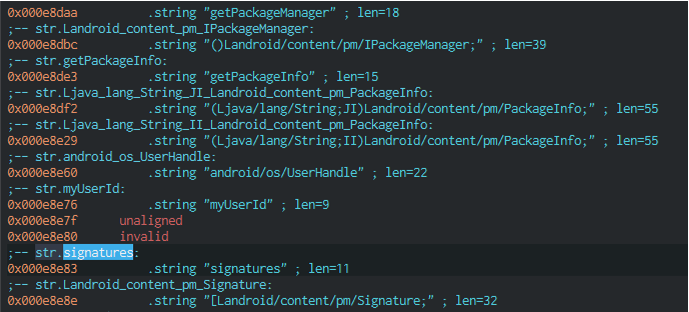
But in our case this didn’t work. After rebuilding the application, it began to “crash” immediately after loading libducex. The app checks the APK signature and terminates if it doesn’t match the expected one. Below you can see decrypted strings used when obtaining APK signatures:
Self-Debugging
Thus, debugging the application by changing the APK didn’t work. Fortunately, there is a way to debug Android applications without setting the debuggable flag and, accordingly, without the need to rebuild and re-sign the file.
This method is more laborious, as it involves building your own Android image and then using it in the emulator. Its description can be found here.
Thus, we built the image, used the debug command given above, and tried to run the application under the debugger. However, the packer held another surprise: after launching the application, the “Waiting For Debugger” window appears only for a fraction of a second, after which normal launch occurs, without waiting for the debugger. This may indicate that the application “debugs itself” so that no one else can debug it.
We found the corresponding functions: a process sets handlers using the rt_sigaction system call, for example, for the SIGCHLD event. This handler checks what happened to the child process, after which it can either terminate or continue its execution.

- In x8 – rt_sigaction call code;
- In x0 – SIGCHLD code;
- In x1 – handler structure address;
- In x2 – flags, in our case 0.
And then another interesting thing occurs: the parent process uses the fork system call to create a child process, which, in turn, will work to monitor the state of the parent process. It uses the ptrace system call with the PTRACE_ATTACH parameter to attach to the parent process, after which it waits for events from it and, depending on what happened, resumes the process or terminates it and its own execution.
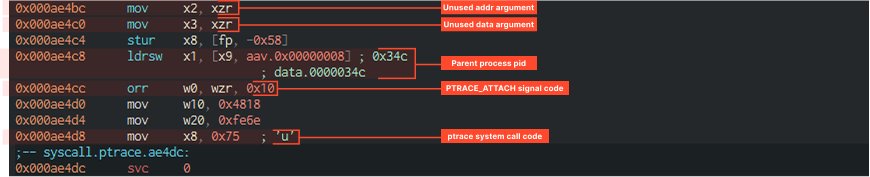
- In x8 – ptrace call code;
- In x0 – PTRACE_ATTACH code;
- In x1 – value from global variable – parent process pid;
- In x2 – unused addr argument;
- In x3 – unused data argument.
So, parent and child processes monitor each other’s state and react in case of certain events. Additionally, considering that a process can have only one tracer, connecting an external debugger becomes impossible in this case.
Detection of Frida, Xposed, and Others
At this point, two options remain: either static code analysis, at most using tools capable of emulating instructions (e.g., emulators on the Unicorn engine), or installing Frida hooks to change application behavior without actual APK modification and still be able to dynamically analyze the unpacking process.
But Frida wouldn’t work either, because the packer has built-in checks for the presence of frida_server, as well as Xposed, Substrate, etc.
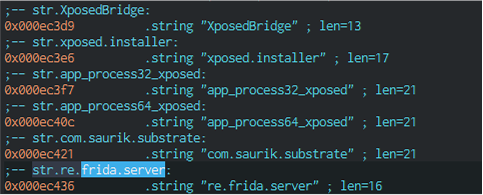
If any of these strings are found in memory, the process terminates execution. This can be patched, but it’ll take time to find the implementations in the code. And we shouldn’t forget about the signature verification used in the library. So we continue with static code analysis.
Where Does the Packer Get Code to Run?
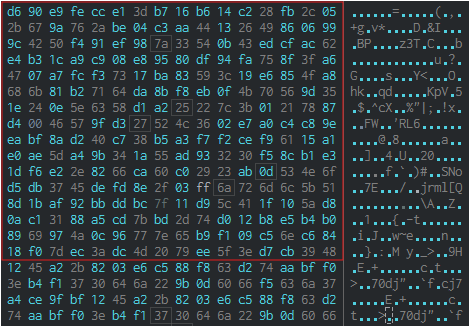
Ducex doesn’t create a separate encrypted file with a payload, instead it stores this code inside its own classes.dex, in a special additional section that goes after the main application code, thus avoiding detection of additional files:
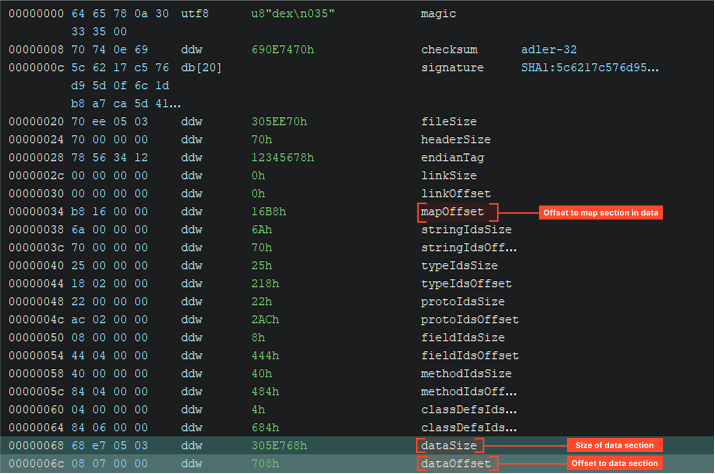
The screenshot shows that after the map section, where everything should have ended, there is an additional section, and a very large one in size. That’s where the payload is located.
The payload, i.e., Triada, is stored as additional dex modules. It’s noteworthy that despite all its complexity, this tool doesn’t fully compress and encrypt the dex files that it later runs. Instead only 2048 == 0x800 bytes from the beginning of each module are encrypted, while the rest remains untouched. Thus, at least the dex module header will always be completely encrypted, as it has a fixed size of 0x70 bytes, further sections do not have a fixed size. There are 5 modules in the file.
There is also a configuration shared by all modules:
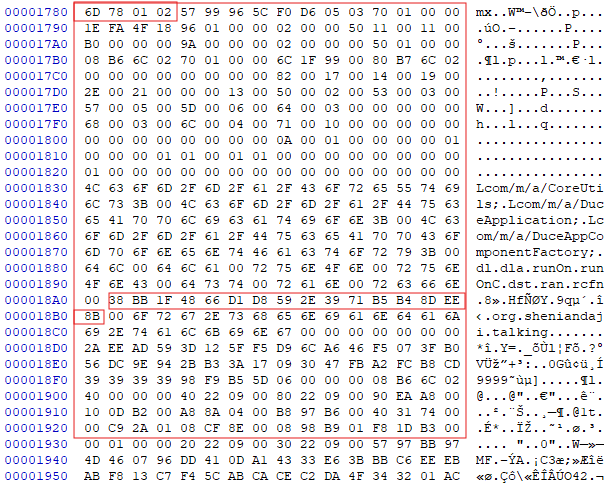
Here there is a certain magic value starting with “mx”, but now with additional bytes x01x02. The most useful thing here is the 16-byte key. It is highlighted in red in the screenshot above.
Additionally, there are configurations for each of the modules storing information for decrypting them:
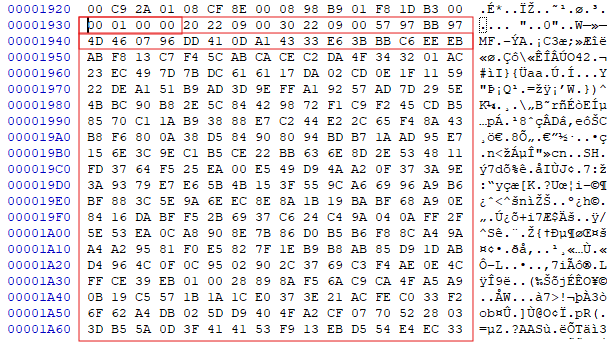
The first 4 bytes of this structure are very important, here we have the value 0x100==256, which means that the first 0x800 bytes of this dex are encrypted. If there was, for example, the number 258, this would mean that part of the dex is compressed using zlib. Then come the highlighted fields with module sizes and another 16-bit decryption key, immediately after which the encrypted module block begins.
File structure can be represented like this:
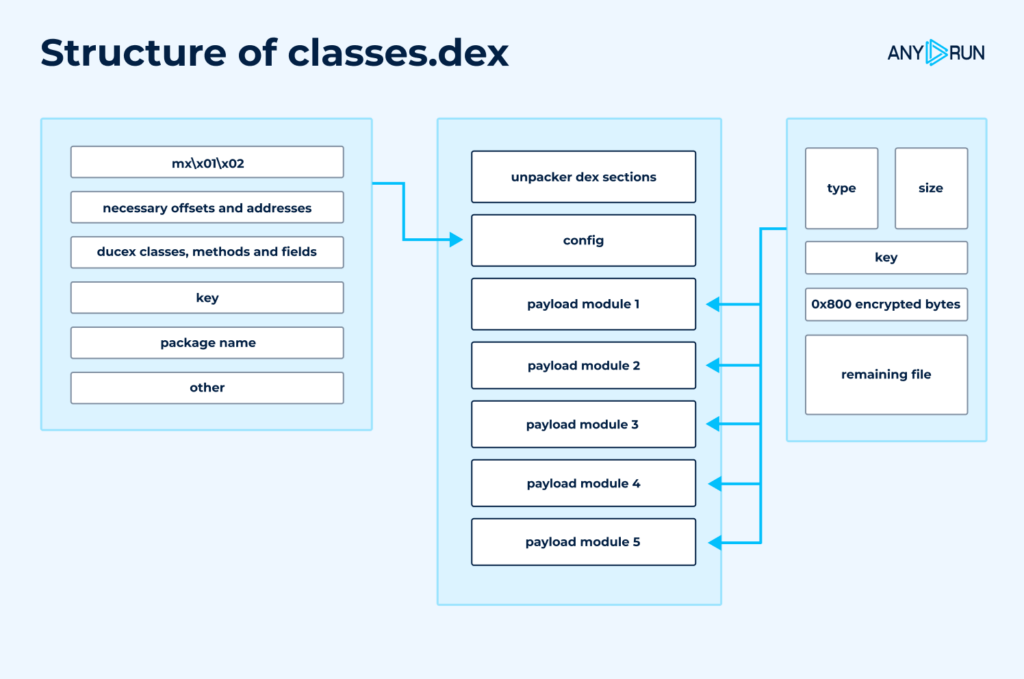
This scheme doesn’t depict all fields in the configurations, but those that were required for our analysis.
How Is Decryption Performed?
Decryption here is quite complex. Two algorithms are used for it: a modified RC4 and SM4.
The first one is well known, but not the second. SM4 is a Chinese block encryption standard. It is not as popular as, for example, AES, and we managed to identify it by the substitution table:
It’s important to note that even the table was encrypted, as well as all the strings used by the tool.
As we know, the unpacker’s dex file contains one main configuration and configurations for each of the 5 modules. All of them require a key. Tracking the execution flow, we can draw the following conclusions:
- native_init method: first, the module is decrypted using the key specified in the module’s configuration. This is a preparatory action that can change depending on the first four bytes of the configuration. In our case it’s 256, which means decryption is needed, as indicated above;
- native_dl method: here, the same decryption function is called, only now a different key is used, the one specified in the configuration shared by all modules.
What Happens Next?
Let’s turn back to our Java code and remember what happens in the attachBaseContext method:
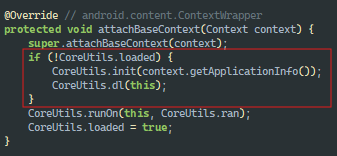
The native init() and dl() methods are called, and there the main decryptions occur. Immediately after this the CoreUtils.runOn() method is called with the method name org.telegram.messenger.ApplicationLoaderImpl as an argument by the decrypted string CoreUtils.ran. Here no decryptions are observed, only the method launch. Now Triada begins its work.
Summary
Ducex is indeed a very complex and interesting Chinese tool, worthy of the malware that it carries as payload. Its developers tried to foresee as much as possible to confuse Triada detection and complicate analyst research.
IOCs
| Title | Description |
| Name | 131eaf37b939f2be9f3e250bc2ae8ba44546801b5ca6268f3a2514e6a9cb8b5c.apk |
| MD5 | 25faee9bbf214d975415ae4bd2bcd7b9 |
| SHA1 | 06f8ca016b2bf006702501263818b7606851f106 |
| SHA256 | 131eaf37b939f2be9f3e250bc2ae8ba44546801b5ca6268f3a2514e6a9cb8b5c |
The post Technical Analysis of Ducex: Packer of Triada Android Malware appeared first on ANY.RUN’s Cybersecurity Blog.
ANY.RUN’s Cybersecurity Blog – Read More